The Prompt Mistakes That Make an AI Image Look Artificial
A list of the language tics and implicit settings that push the model toward the plastic.
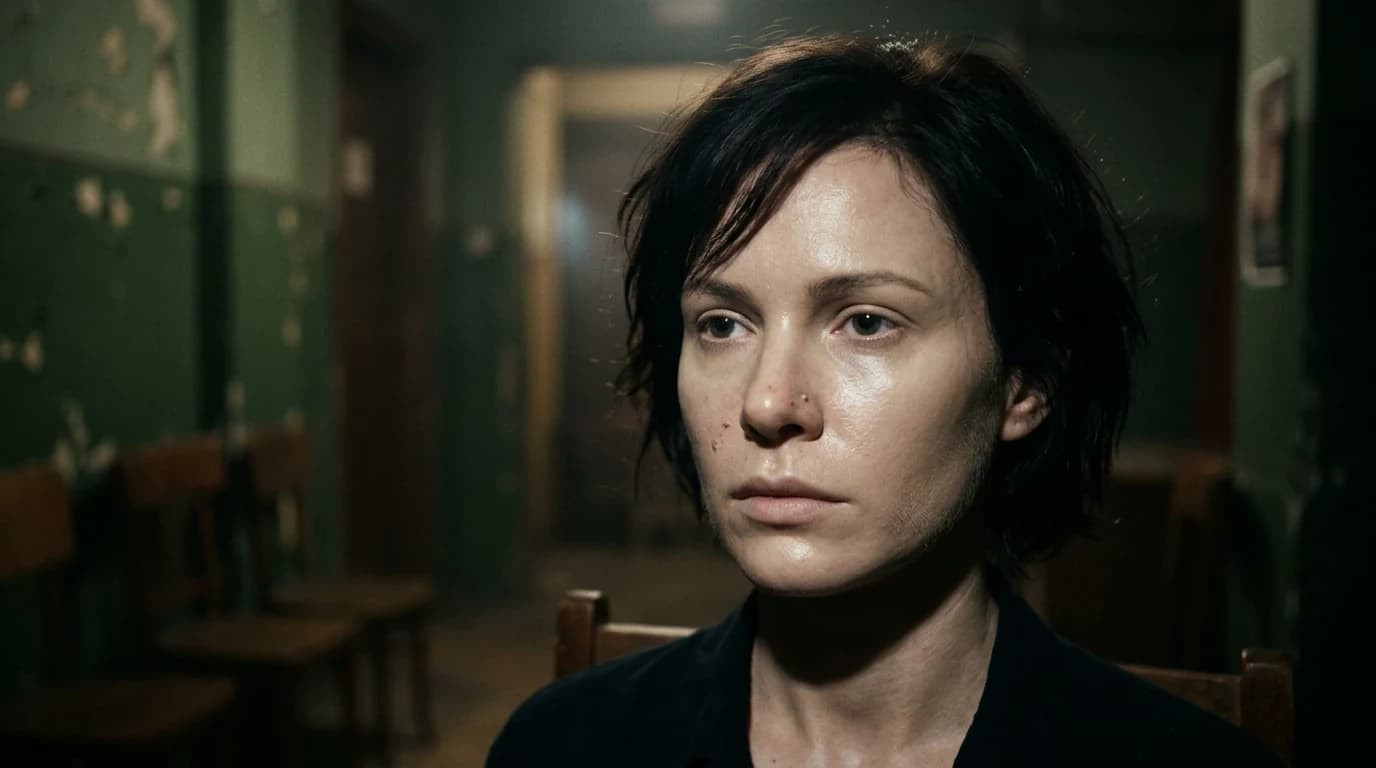
You write a prompt thinking "I am going to make it cinema".
You generate.
And you immediately see the plastic effect.
Smoothed skin, impossible light, a set shiny like a showroom, eyes too sharp, shadows that tell nothing. It is not because you lack talent. It is because certain prompt mistakes trigger ultra-artificial visual correlations, almost automatically.
The goal of this masterclass: teach you to spot these mistakes upstream, then to fix them with a clear, reproducible, pro method.
Why an image becomes artificial in a few words
The words of a prompt are not neutral. They activate "families" of images learned by the model. When you stack masterpiece, 8k, insane details, perfect skin, you often push toward a showroom render, not toward a credible film frame.
The trap is that the result can seem impressive at first glance. Then the human eye drops off. Too clean. Too sharp. Too fake.
Set insight
A realistic prompt describes a shootable scene, not a contest poster.
When your prompt "does not work", the correction base stays the same as in why your prompt does not work and how to fix it, but here we push further on the concrete visual mistakes that create the artificial look.
3 beginner scenarios that come back every week
Scenario 1, a "premium" portrait that looks like a 3D mannequin
Usual prompt: too much abstract beauty, not enough light geometry.
Result: porcelain, marble eyes, a too-perfect mouth.
Fix:
- replace the superlatives with camera/light info
- add skin texture and micro imperfections
- limit the global sharpness
Scenario 2, a "cine" urban scene that becomes neon cartoon
Usual prompt: "dark cinematic cyberpunk realistic" with no context.
Result: saturated reflections, inconsistent colors, noisy background.
Fix:
- describe the real place
- choose a main light source
- restrict the palette and the contrast
Scenario 3, a dramatic atmosphere that becomes fake "HDR"
Usual prompt: "dramatic light, high contrast, ultra detailed".
Result: burned sky, shiny skin, shadows with no material.
Fix:
- describe the exposure and the shadow direction
- remove the generic "punch" vocabulary
- first fix the light structure
The 12 prompt mistakes that plasticize an image
1) Superlatives with no physical information
stunning, masterpiece, epic do not replace a shot, a focal length, a source.
2) "Perfect skin"
This pair of words pushes directly toward a wax texture.
3) Mixing 3 contradictory styles
"film noir + fashion glossy + sci-fi neon" in one line, inconsistent image guaranteed.
4) Forgetting the motivated light
With no readable source, the model invents artificial highlights.
5) Forgetting the distance
With no subject/background distance, the depth seems false.
6) Focal length inconsistent with the frame
Asking for "85mm portrait" on a wide shot is contradictory. To master this point, link your prompt to how to use camera lenses in an AI prompt.
7) Negative too long
30 prohibitions make the internal priorities fight.
8) Too much "clean"
clean background, clean face, clean style kills the real.
9) Tint with no hierarchy
Pushing the color before the light produces non-credible skins.
10) Adding grain to hide structural flaws
Grain is not a magic patch.
11) Modifying 10 parameters at once
You never learn what really fixed the image.
12) Copying viral prompts with no context
The "copy-pasted" prompts often carry biases not adapted to your subject.
Strict template that avoids 70% of the drifts
The critical part stays [SCENE DESCRIPTION]. It must describe a shootable shot:
- who
- where
- action
- light
- subject/background relation
Correction workflow in 8 minutes
- Copy your raw prompt into a text file.
- Remove the empty adjectives.
- Add shot/focal length/camera height.
- Add the main light source.
- Add a real set imperfection.
- Add anti-fake-render constraints.
- Generate two variants with a single difference.
- Compare at zoom and full screen.
Raw -> corrected example
Raw:
beautiful cinematic woman portrait masterpiece 8k ultra detailed
Corrected:
Quick diagnostic table
| Visible symptom | Probable cause in the prompt | Immediate correction |
|---|---|---|
| Waxy skin | "perfect skin", too much clean | skin texture + imperfections |
| Eyes too shiny | light not described | source + direction + intensity |
| "Video game" set | palette and contrast not framed | reduce saturation, anchor material |
| Deformed face | focal length/frame inconsistent | set a realistic focal length + distance |
| Artificial image despite sharpness | lack of hierarchy | simplify the prompt and the priorities |
Practical exercise
Take a prompt that fails, apply the workflow above, and compare before/after on 3 generations. What to observe:
- how a vague request becomes a usable instruction
- how the sentence structure changes the final result
- how to simplify without losing the intention
Trench warfare, what beginners do wrong
- Stacking references: three films, two photo styles, one social trend, inconsistent result.
- Looking for skin perfection: the more you ask for "perfect", the more you lose the human.
- Confusing clean and realistic: the real contains texture, dust, micro flaws.
- Denying the light: if the source does not exist, the face cannot seem true.
- Fixing everything in post: post-production helps, it does not save a false base.
- Not locking the gains: a prompt that works must be versioned.
- Ignoring character consistency: for image series, apply the logic of how to write a prompt for a realistic and consistent character.
Set insight
Realism is a sum of small visual truths, not a "high quality" option.

FAQ
Foire aux questions
Réponses rapides aux questions les plus fréquentes sur cet article.
Why is "photorealistic" alone not enough?
Because this word describes neither light, nor geometry, nor shot intention. The main reason is that the model fills the ambiguous zones with approximations, which creates visible inconsistencies when the scene becomes complex. The most reliable method consists of testing two close variants with the same conditions (seed, light, framing), then keeping the one that stays readable after several reviews. If you hesitate, favor the global consistency of the sequence and document your choice, because that is what gives a credible result over time.
How many negatives should you put?
In general 4 to 8, targeted on your recurring mistakes. The right answer depends above all on the scene intention and the consistency between the shots, not on an absolute rule applied everywhere. The most reliable method consists of testing two close variants with the same conditions (seed, light, framing), then keeping the one that stays readable after several reviews. If you hesitate, favor the global consistency of the sequence and document your choice, because that is what gives a credible result over time.
Should you always specify the focal length?
Yes, especially if you want to stabilize the faces and the perspective. The right answer depends above all on the scene intention and the consistency between the shots, not on an absolute rule applied everywhere. The most reliable method consists of testing two close variants with the same conditions (seed, light, framing), then keeping the one that stays readable after several reviews. If you hesitate, favor the global consistency of the sequence and document your choice, because that is what gives a credible result over time.
How to know if a prompt is too long?
When it contradicts itself or repeats the same ideas in ten forms. Start with a simple and stable version, then add a single constraint at a time to see clearly what improves or worsens the result. The most reliable method consists of testing two close variants with the same conditions (seed, light, framing), then keeping the one that stays readable after several reviews. If you hesitate, favor the global consistency of the sequence and document your choice, because that is what gives a credible result over time.
Grain in the prompt or in post?
Both can work, but the grain must never mask a badly thought-out light. In practice, treat this decision as a narrative parameter, not as a simple technical setting, otherwise the render quickly becomes inconsistent from one shot to the next. The most reliable method consists of testing two close variants with the same conditions (seed, light, framing), then keeping the one that stays readable after several reviews. If you hesitate, favor the global consistency of the sequence and document your choice, because that is what gives a credible result over time.
Why do my results change from one session to the next?
Model, seed, settings, and generation context change the output. Document everything. The main reason is that the model fills the ambiguous zones with approximations, which creates visible inconsistencies when the scene becomes complex. The most reliable method consists of testing two close variants with the same conditions (seed, light, framing), then keeping the one that stays readable after several reviews. If you hesitate, favor the global consistency of the sequence and document your choice, because that is what gives a credible result over time.
Can I keep a "clean" style with no plastic effect?
Yes, if the light stays motivated and the skin texture is preserved. In practice, treat this decision as a narrative parameter, not as a simple technical setting, otherwise the render quickly becomes inconsistent from one shot to the next. The most reliable method consists of testing two close variants with the same conditions (seed, light, framing), then keeping the one that stays readable after several reviews. If you hesitate, favor the global consistency of the sequence and document your choice, because that is what gives a credible result over time.
How to progress fast?
Test few variants, well noted, with a single variable modified at a time. Start with a simple and stable version, then add a single constraint at a time to see clearly what improves or worsens the result. The most reliable method consists of testing two close variants with the same conditions (seed, light, framing), then keeping the one that stays readable after several reviews. If you hesitate, favor the global consistency of the sequence and document your choice, because that is what gives a credible result over time.
Advanced workshop, a reproducible correction protocol
You want to progress fast, here is a simple protocol to repeat.
Session 1, clean the semantic noise
You take a failed prompt.
You remove all the non-measurable words.
You keep only:
- subject
- action
- place
- light
- focal length
- texture
Then you regenerate.
Session 2, add the optical structure
You impose:
- shot type
- camera angle
- subject/background distance
- main source
You observe whether the geometry improves.
If yes, you lock this version as the baseline.
Session 3, refine the material
You add:
- natural skin texture
- micro imperfection
- subtle grain
- anti-fake-render prohibitions
You compare the three generations side by side.
Pro insight
The goal is not to find a "genius" prompt, the goal is to build a stable system that avoids the mistakes.
Visual diagnostics, an express analysis grid
When an image seems artificial, answer these questions:
- Does the light have a credible source?
- Does the skin keep a natural relief?
- Are the reflections consistent with the source?
- Does the depth of field follow a physical logic?
- Does the background support the subject or parasite it?
If you have two "no" answers, the prompt must be rewritten.
Detailed practical case
Initial prompt
cinematic masterpiece portrait ultra detailed perfect skin
Observed problems
- smooth skin
- artificial eyes
- contrast with no volume
Structured rewrite
Result
- more credible skin
- readable light
- consistent depth
Post mistakes that reinforce the fake
- global sharpen too strong
- aggressive S contrast
- excessive red skin saturation
- halos on edges
- "dirty" non-homogeneous grain
The prompt is not solely responsible.
The finish can ruin a sound base.
Team work method
If you are several:
- one prompt author
- one visual reviewer
- one narration reviewer
Each gives a short return:
- what works
- what breaks
- what we test next
You avoid the fuzzy debates, you keep traceable decisions.
Massive troubleshooting, complementary block
16) Portrait too "beauty ad"
Fix: reduce the implicit smoothing, reinforce the micro-shadows.
17) Set with no depth
Fix: add subject-background distance and backlight.
18) Too much flare
Fix: limit the forced anamorphic, keep a subtle flare.
19) Eyes too clear
Fix: reduce the highlights and the local saturation.
20) Plastic lips
Fix: subtle texture, avoid the words "perfect makeup".
21) Inconsistent glasses reflections
Fix: three-quarter angle, simplified reflection.
22) Background too sharp
Fix: specify the depth of field and the distance.
23) "Orange" complexion
Fix: control the key temperature and the final balance.
24) Shadows with no detail
Fix: light fill or natural bounce.
25) Too "video game" render
Fix: reduce the saturation and the sharpness, prioritize the material.
26) Inconsistency between versions
Fix: stable seed during the diagnosis.
27) Long but empty prompt
Fix: remove the decorative adjectives.
28) Short prompt too abstract
Fix: add minimal physical data.
29) Fake text in the image
Fix: short text or addition in post.
30) Decision fatigue
Fix: short sessions, clear rejection criteria.
Additional FAQ
Can I stay fully in French?
Yes, but some English technical tags stay more reliable depending on the model. In practice, treat this decision as a narrative parameter, not as a simple technical setting, otherwise the render quickly becomes inconsistent from one shot to the next. The most reliable method consists of testing two close variants with the same conditions (seed, light, framing), then keeping the one that stays readable after several reviews. If you hesitate, favor the global consistency of the sequence and document your choice, because that is what gives a credible result over time.
Is the word "cinematic" enough?
No, never with no camera/light context. In practice, treat this decision as a narrative parameter, not as a simple technical setting, otherwise the render quickly becomes inconsistent from one shot to the next. The most reliable method consists of testing two close variants with the same conditions (seed, light, framing), then keeping the one that stays readable after several reviews. If you hesitate, favor the global consistency of the sequence and document your choice, because that is what gives a credible result over time.
Should you always give the time of day?
Yes if the light depends on a natural source. The right answer depends above all on the scene intention and the consistency between the shots, not on an absolute rule applied everywhere. The most reliable method consists of testing two close variants with the same conditions (seed, light, framing), then keeping the one that stays readable after several reviews. If you hesitate, favor the global consistency of the sequence and document your choice, because that is what gives a credible result over time.
How to know if I have too many elements?
If your gaze does not know where to go, there are too many. Start with a simple and stable version, then add a single constraint at a time to see clearly what improves or worsens the result. The most reliable method consists of testing two close variants with the same conditions (seed, light, framing), then keeping the one that stays readable after several reviews. If you hesitate, favor the global consistency of the sequence and document your choice, because that is what gives a credible result over time.
Should I mention the sensor?
Optional, useful above all for the inter-shot consistency. The right answer depends above all on the scene intention and the consistency between the shots, not on an absolute rule applied everywhere. The most reliable method consists of testing two close variants with the same conditions (seed, light, framing), then keeping the one that stays readable after several reviews. If you hesitate, favor the global consistency of the sequence and document your choice, because that is what gives a credible result over time.
Can you correct without rewriting everything?
Yes, by changing one variable at a time. In practice, treat this decision as a narrative parameter, not as a simple technical setting, otherwise the render quickly becomes inconsistent from one shot to the next. The most reliable method consists of testing two close variants with the same conditions (seed, light, framing), then keeping the one that stays readable after several reviews. If you hesitate, favor the global consistency of the sequence and document your choice, because that is what gives a credible result over time.
What is the best anti-fake reflex?
Replace the superlatives with shooting data. In practice, treat this decision as a narrative parameter, not as a simple technical setting, otherwise the render quickly becomes inconsistent from one shot to the next. The most reliable method consists of testing two close variants with the same conditions (seed, light, framing), then keeping the one that stays readable after several reviews. If you hesitate, favor the global consistency of the sequence and document your choice, because that is what gives a credible result over time.
When to validate a prompt?
When two consecutive generations stay credible with minor variations. In practice, treat this decision as a narrative parameter, not as a simple technical setting, otherwise the render quickly becomes inconsistent from one shot to the next. The most reliable method consists of testing two close variants with the same conditions (seed, light, framing), then keeping the one that stays readable after several reviews. If you hesitate, favor the global consistency of the sequence and document your choice, because that is what gives a credible result over time.
Final extension, weekly production method
If you want to professionalize your level, organize your sessions in cycles:
Monday, diagnosis
You collect 10 failed outputs and you classify the flaws.
Tuesday, targeted correction
You rewrite 3 prompts with one variable changed.
Wednesday, stress test
You test these prompts on several close scenes.
Thursday, consolidation
You set an internal template and style prohibitions.
Friday, delivery
You publish only the outputs validated against a checklist.
This rhythm transforms the progression into a system.
Mini final checklist
- readable light source
- non-plastic skin
- stable geometry
- consistent reflections
- clean narrative background
If a box fails, you correct before publication.
Field appendix, advanced calibration over 7 days
Day 1, you isolate your 3 most frequent mistakes.
Day 2, you build 3 clean prompts, each centered on a single correction.
Day 3, you compare these prompts on 2 different scenes.
Day 4, you lock a baseline version.
Day 5, you test only the light.
Day 6, you test only the focal length.
Day 7, you validate a mini library of robust prompts.
This routine seems simple. It is formidable.
Progress measure
Note each session:
- number of rejected renders
- number of "almost good" renders
- number of validated renders
If your rejection curve drops and your validations rise, your system works.
Quick decision guide before publication
Question 1, is the image credible at a normal reading distance?
Question 2, does the image stay credible at zoom?
Question 3, does the subject stay the main focal point?
Question 4, does the light tell a plausible source?
Question 5, does the skin seem human, not synthetic?
If you answer no to two questions, publication postponed.
Important focus, the "false positives"
Some images give an immediate "wow" impression but do not hold more than 3 seconds of observation.
It is a false positive.
You must train yourself to reject them fast.
Pro insight
The demand for realism plays out in the second reading, not in the first effect.
Expert troubleshooting section
31) "Icy" complexion
Cause: badly distributed desaturation.
Fix: restore the micro variation in the flesh tones.
32) "Stuck" shadows
Cause: local contrast too hard.
Fix: soften the transitions on the cheekbones and the jaw.
33) "Cardboard" set
Cause: materials not described.
Fix: add wall/floor material in the prompt.
34) Excessively sharp eyelashes
Cause: global sharpen.
Fix: selective sharpness only off the skin.
35) Shiny forehead
Cause: uncontrolled highlights.
Fix: more diffuse source or adjusted angle.
36) "Gel" lips
Cause: artificial glossy render.
Fix: subtle matte texture and moderate saturation.
37) Inconsistent ears
Cause: angle + badly defined hair.
Fix: simplify the hairstyle and the head tilt.
38) Involuntary "teal-orange" colors
Cause: too-strong style correlation.
Fix: limit the style vocabulary and specify the palette.
39) Pores too visible
Cause: texture over-interpretation.
Fix: reduce the micro details in the prompt.
40) Empty gaze
Cause: no action intention.
Fix: specify what the character looks at.
Advanced FAQ
Should I create prompt presets?
Yes, but per scene family, not universal. The right answer depends above all on the scene intention and the consistency between the shots, not on an absolute rule applied everywhere. The most reliable method consists of testing two close variants with the same conditions (seed, light, framing), then keeping the one that stays readable after several reviews. If you hesitate, favor the global consistency of the sequence and document your choice, because that is what gives a credible result over time.
How long to keep a baseline prompt?
As long as it stays stable over several sessions. This figure is a reliable starting point, but adjust it according to the type of movement, the density of the frame and the expected level of realism. The most reliable method consists of testing two close variants with the same conditions (seed, light, framing), then keeping the one that stays readable after several reviews. If you hesitate, favor the global consistency of the sequence and document your choice, because that is what gives a credible result over time.
Can you industrialize this method?
Yes, with templates + visual review + logs. In practice, treat this decision as a narrative parameter, not as a simple technical setting, otherwise the render quickly becomes inconsistent from one shot to the next. The most reliable method consists of testing two close variants with the same conditions (seed, light, framing), then keeping the one that stays readable after several reviews. If you hesitate, favor the global consistency of the sequence and document your choice, because that is what gives a credible result over time.
What is the good rejection/validation ratio at the start?
60/40 is already very correct. In practice, treat this decision as a narrative parameter, not as a simple technical setting, otherwise the render quickly becomes inconsistent from one shot to the next. The most reliable method consists of testing two close variants with the same conditions (seed, light, framing), then keeping the one that stays readable after several reviews. If you hesitate, favor the global consistency of the sequence and document your choice, because that is what gives a credible result over time.
How to avoid the fashion-of-the-moment effect?
Stay anchored in physical descriptions. Start with a simple and stable version, then add a single constraint at a time to see clearly what improves or worsens the result. The most reliable method consists of testing two close variants with the same conditions (seed, light, framing), then keeping the one that stays readable after several reviews. If you hesitate, favor the global consistency of the sequence and document your choice, because that is what gives a credible result over time.