How to Choose the Right Camera Angles in AI
Choosing credible, narrative camera angles to avoid flat or artificial AI images.
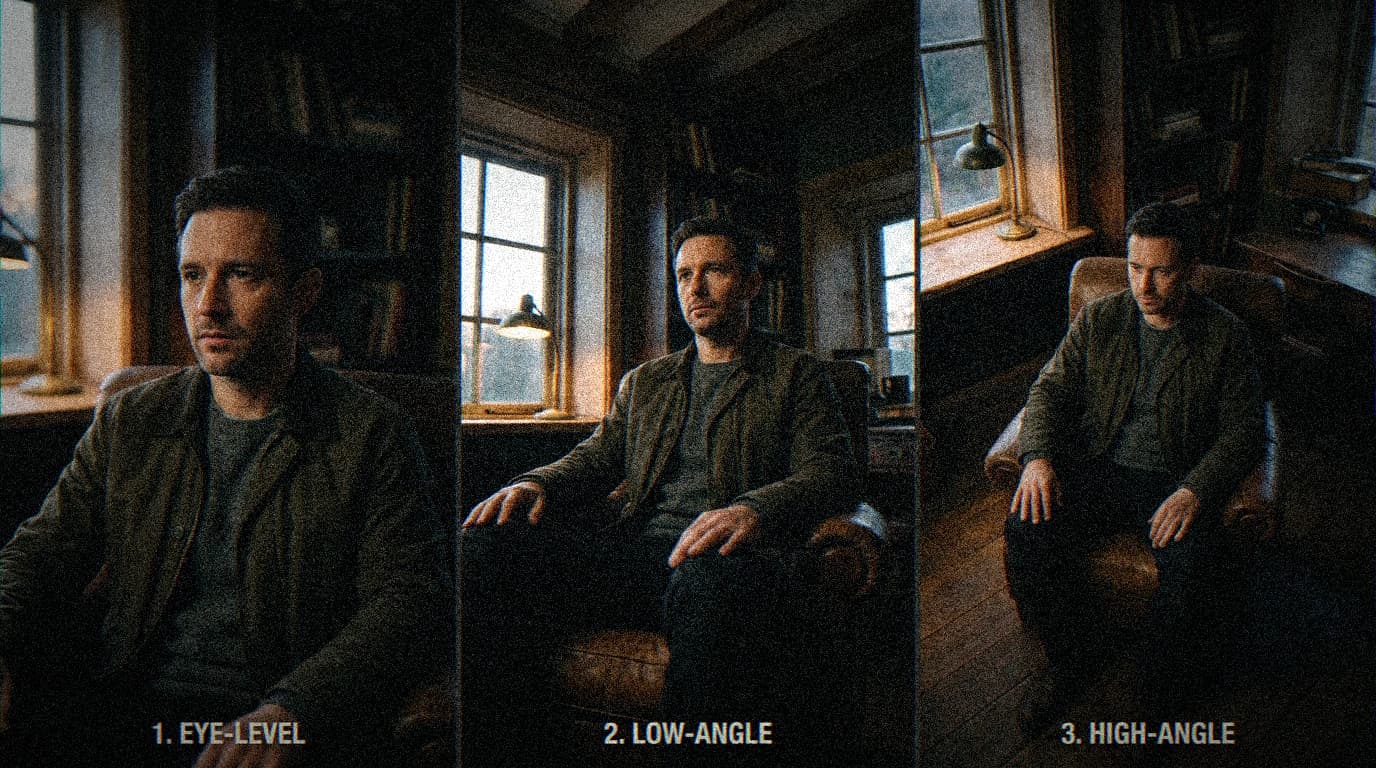
The camera angle changes everything. Same subject, same light, different angle, different emotion.
In an AI prompt, the angle avoids the "frontal catalog" effect. A correct angle serves the story, not the visual ego. To keep angle consistency across a sequence, pair this work with how to build a cinematic scene shot by shot. If the lateral geometry is unstable, how to fix a bad visual composition helps you isolate the problem before changing the camera height.
Base angles
- Eye-level: neutral, human
- Low-angle: power, threat
- High-angle: fragility, isolation
- Three-quarter: natural, alive
Prompt template
Add to the scene: eye level, slight low-angle, high-angle.
To avoid optical inconsistencies when changing angle, complete it with how to use camera lenses in an AI prompt. For the camera height to dialogue with the overall frame, link this guide to how to frame an AI image like a cinema pro and to how to use the rule of thirds in AI generation.
Trench warfare
- extreme angle with no justification
- changing angle at every shot with no continuity
- low-angle + focal length too wide + close face
- high-angle that crushes the subject
- systematic frontal
Understanding the narrative effect of angles
A camera angle is not neutral. It says something about the character.
Eye-level:
- a balanced relationship
- a human gaze
Low-angle:
- domination
- threat
- power
High-angle:
- fragility
- solitude
- loss of control
Three-quarter:
- natural
- proximity
- a more organic reading of the face
Pro insight The right angle is the one that serves the dramatic intention, not the one that impresses.
3 detailed beginner scenarios
Scenario 1, permanent low-angle
You put everything in low-angle to "make it cinema". Result: a visual caricature.
Fix:
- reserve low-angle for the moments of shift
- come back to eye-level for the rest
Scenario 2, badly used high-angle
You want to show weakness, but the subject disappears.
Fix:
- a moderate high-angle
- keep the face readable
- compensate with directional light
Scenario 3, anarchic angle change
Each shot changes angle with no logic.
Fix:
- define a narrative axis
- change angle only when the emotion changes
Ultra-detailed workflow
Step 1, emotional goal of the shot
Write in 1 sentence: "This shot must make you feel…"
Step 2, choose the dominant angle
Among:
- eye-level
- low-angle
- high-angle
- three-quarter
Step 3, pair with the focal length
Examples:
- low-angle + moderate focal length
- high-angle + medium shot
Step 4, check the readability
The face must stay understandable.
Step 5, sequence continuity
You must be able to justify each angle transition.
Angle -> effect table
| Angle | Main effect | Risk | Fix |
|---|---|---|---|
| Eye-level | human neutrality | flatness | reinforce the light staging |
| Low-angle | power | over-dramatization | limit the frequency |
| High-angle | fragility | crushing | keep close to the subject |
| Three-quarter | natural | lack of intensity | play with contrasts and the gaze |
Massive trench warfare
1) Choosing the angle afterward
Fix: angle defined before the prompt.
2) Low-angle + short focal + close face
Fix: move the subject away or lengthen the focal length.
3) High-angle with no reason
Fix: use it on a clear narrative weakness.
4) No consistency in the scene
Fix: a global axis and motivated exceptions.
5) Systematic frontal
Fix: alternate with three-quarter.
6) Extreme angles to hide a lack of idea
Fix: come back to a clear intention.
7) Forgetting the off-frame
Fix: the angle must dialogue with the off-frame.
8) Too many changes in a short shot
Fix: one angle, one intention.
9) Cutting before the emotional reading
Fix: let the shot breathe.
10) Validating on the preview only
Fix: full screen + mobile.
Core addendum
The camera height is a status choice as much as a geometric one. The reference sheets on the camera angle remind us that the vertical axis influences our reading of power well before the costume details. For a more cinematic set culture, browsing the accessible analyses via theasc.com helps connect angle and light without falling into the advertising catalog. The BFI also offers useful staging readings when you want to justify an angle by the story, not by the effect.
In AI, your core addendum consists in naming the angle before the prompt, pairing each height change with an emotional verb, and keeping a reference height for at least sixty percent of a scene's shots, except for a motivated rupture.
Troubleshooting addendum
When the angle seems good but the image "does not play", check the implicit focal length: a low-angle with a perspective too aggressive on a close face often looks plastic. Test a longer focal length in the prompt language or push the subject back in the description. If the high-angle crushes, you are not obliged to abandon the angle: bring the frame closer on the chest, leave a sculpting side light, and refuse a set that competes with the head.
If two dialogue shots have inconsistent heights, correct the relational geometry first, before the grading. Note the camera height on your shotlist, otherwise you will repeat the same discordances at each regen.
Scenarios
Confrontation scenario. You go from eye-level to a moderate low-angle at the moment the character settles a decision: you first set a stable shot that lays the eye line, then you slightly raise the camera to mark the shift. The trap is chaining three extreme angles in a row: you tire the viewer and you lose the impact of the gesture.
Vulnerability scenario. You use a soft high-angle on a medium shot to keep the hands readable: you show the small size of the body in the place without distorting the face. If you seek a cold isolation, you leave more air above the head and you harden the light a bit, but you avoid the crushing that erases the emotion.
Synthetic documentary scenario. You stay on eye-level with a slight three-quarter for a credible visual testimonial, then you only change the height when the subject really changes inner state. This discipline avoids the "clip" edit that suffocates AI images.
Bridge to the local set
If you work in Flux, SDXL or an equivalent graph, treat the angle as a constraint as important as the ratio: write eye level, low angle, or high angle early in the prompt, before the decorative adjectives, otherwise the model often smooths toward a neutral "showcase" camera. Keep the same angle wording for a whole sequence as long as the emotion does not shift, then change a single height word at the moment of the rupture. Compare with a fixed seed to isolate the real effect of the change. This bridge between dramatic intention and machine execution is what separates a series of brilliant images from a credible scene: the angle stops being a style, it becomes a reproducible data point in your production log.
Advanced workshop, choosing the angles that tell a story
You want to stop using spectacular angles at random. This workshop teaches you to connect height, distance, and camera axis to a clear emotional intention.
Module 1, strict preparation
Duration, 30 minutes.
You write a single scene sheet with:
- the main emotional goal
- the secondary stake
- the expected progression
- the fixed technical constraints
- the non-negotiable failure criteria
This document must stay visible during the whole work. As soon as you deviate, you go back to the sheet.
Module 2, controlled batch production
Duration, 90 minutes.
You produce short batches, never uncontrolled marathons.
- batch A, a sober version
- batch B, a more tense version
- batch C, a more intimate version
You compare according to a single grid, not according to the impression of the moment.
Module 3, cold review
Duration, 20 minutes.
You step away from the screen for five minutes, then you come back with this checklist:
- instant readability
- material consistency
- visual continuity
- emotional progression
- overall feeling of naturalness
If two criteria fall, you do not finalize.
Module 4, test delivery
Duration, 15 minutes.
You export a short cut and have an external person watch it. You note their feedback word for word, with no arguing.
Only then do you correct.
Quick decision table
| Situation | Beginner reaction | Pro reaction |
|---|---|---|
| A shot is beautiful but inconsistent | keep it | delete it |
| The render is too clean | add effects | correct material and light |
| The narrative is vague | generate more | simplify the structure |
| The edit is soft | speed up everywhere | reinforce the shift points |
| The emotion does not come through | push the grading | correct the shot direction |
Complementary trench warfare, 10 silent mistakes
- You validate too fast when it is pretty. Fix, a mandatory comprehension test.
- You adjust the color instead of the meaning. Fix, correct the intention first.
- You accumulate versions without deciding. Fix, the rule of 3 variants max.
- You forget the mobile effect. Fix, check on a small screen too.
- You use vague words in the prompts. Fix, concrete, visible verbs.
- You confuse density and disorder. Fix, prioritize the elements.
- You do not note the winning settings. Fix, a minimum production log.
- You correct in post what should be corrected in generation. Fix, go back to the source.
- You ignore decision fatigue. Fix, short sessions and clear goals.
- You deliver with no break. Fix, cold validation the next morning.
FAQ
Foire aux questions
Réponses rapides aux questions les plus fréquentes sur cet article.
Do I have to be an expert to apply this method
No. You mostly have to be disciplined about the order of decisions, more than about prior technical knowledge. A beginner who writes one intention sentence per shot, who names an angle before prompting, and who validates on mobile already avoids the majority of "impressive but fake" failures. Expertise is built by repeating comparable scenes and noting why an angle worked in a precise context. The trap is to believe that a new model replaces this useful slowness: it amplifies your habits, good or bad. So start small, one short sequence, a stable charter, a minimal log, then expand when your external tests become predictable again.
Why do my renders stay fake despite good local models
Because credibility is a chain: camera height, implicit focal length, light, grain continuity, relational geometry between shots. A powerful model can make each image appealing in isolation while making the series inconsistent if you change angle with no motif or if you push "showroom" contrasts. The viewer detects less the perfection of the textures than the inconsistencies of status and space. Come back to a reference height, to a dominant light source, and to angle transitions justified by the emotion. Often, the fake disappears when you stop compensating for a vague brief with aggressive style.
How long does it take to see real progress
With short daily sessions and a stable protocol, many creators see a clear jump in one to two weeks, not because the tool changes, but because the judgment becomes faster. Measurable progress appears when you repeat the same comparable exercises and you reduce the number of images discarded for the same reasons. If you constantly change style or model, you navigate sideways. Set a weekly exercise, for example three camera heights on the same scene, and note the winning sentence each time. You turn intuition into method.
How do I avoid getting lost in the settings
Choose an honest preset as a starting point, then modify only one variable at a time between two generations: angle, then light, then texture, never all three together. Record the seed, steps, CFG, and one sentence about the problem you are trying to solve. If you feel absorbed by the sliders, come back to the brief: "this shot must make you feel what" is more powerful than a badly explained slider. Limit yourself to three variants per decision, then decide: prolonged indecision is often a symptom of an insufficient brief, not of a lack of models.
What simple test guarantees better readability
The two-second test stays the best effort-to-information ratio. Show a shot very briefly to an external person, then ask what they saw first and what they felt, with no context. If the answer diverges from your intention, simplify: angle, set, or contrast. Repeat after each major correction. This test costs little time and it extinguishes the internal debates where "beautiful" is confused with "clear". For a sequence, run the test on the shift shots only: they are the ones that betray the fake in a chain.
Should I favor realism or style
Start with readability, then consistency between shots, and finally style as a mastered signature. A strong style on a confusing reading looks like a filter; a sober style on a clear reading looks like a voice. In AI, many push the style to mask an angle that does not serve the story: it is a short circuit. Choose a register, hold it across the whole scene, and use the spectacular effects only when the emotion demands it. The style then becomes a promise you can repeat across several projects without tiring the viewer.
How do I know I am really ready to publish
Your sequence must be understandable with no mandatory audio commentary, stay stable on a cold screen and a small screen, and produce in a third party an emotional response close to your goal without you having to convince them through explanation. If each shot needs a preamble to be defended, it still lacks either the angle, the framing, or the lighting consistency. Do a "next morning" validation: the rested eye betrays the fatigue compromises. When the three tests pass, you are in a reasonable delivery zone, even if there is always a margin of creative standard left.
I am short on time, what is the minimal version of the method
Write five lines of brief, limit yourself to three generation batches per shot, and impose a two-minute external test on the rough edit. These three constraints cost little compared to the time wasted regenerating with no criterion. Add a single reference angle for the whole scene, and one exception motivated by emotion. Even minimalist, this framework avoids the most costly mistakes: height inconsistency, overload of variations, and validation in a vacuum. You can enrich the method later, but this short version is already professional if you respect it strictly.
How do I keep a personal signature without falling into cliché
The signature is born less from a single effect than from a coherent combination of repeated decisions: a light register, a way of placing the gaze, a mastered frequency of dramatic angles. The cliché appears when you apply the same spectacular effect with no narrative motif, for example low-angle everywhere. Document your winning choices over three projects: you will see a touch emerge without needing an artificial identity "filter". Technical authenticity is not exuberance, it is intelligent consistency.
The biggest lever to progress in 30 days
The most underrated lever is the cold review: produce less, but compare better. At the end of each session, note one repeated angle mistake, one fix that worked, and one question to test tomorrow. This ritual beats the blind accumulation of renders. Add a weekly review where you look only at the transitions between shots: it is often there that the angles betray the intention. In thirty days, you do not become a magician, but you become predictable to yourself, which is the basis of a durable pro level.
Which blog guides should I chain after this one
Connect the angles to how to use camera lenses in an AI prompt, how to frame an AI image like a cinema pro, and how to use the rule of thirds in AI generation so that camera height, focal length, and placement in the frame share the same vocabulary. If the series stays "almost good", how to fix a bad visual composition helps you isolate the conflicts before changing models.