How to Create Visual Storytelling with No Dialogue
Telling a clear story with the image, the frame, the light and the rhythm, without depending on dialogue.
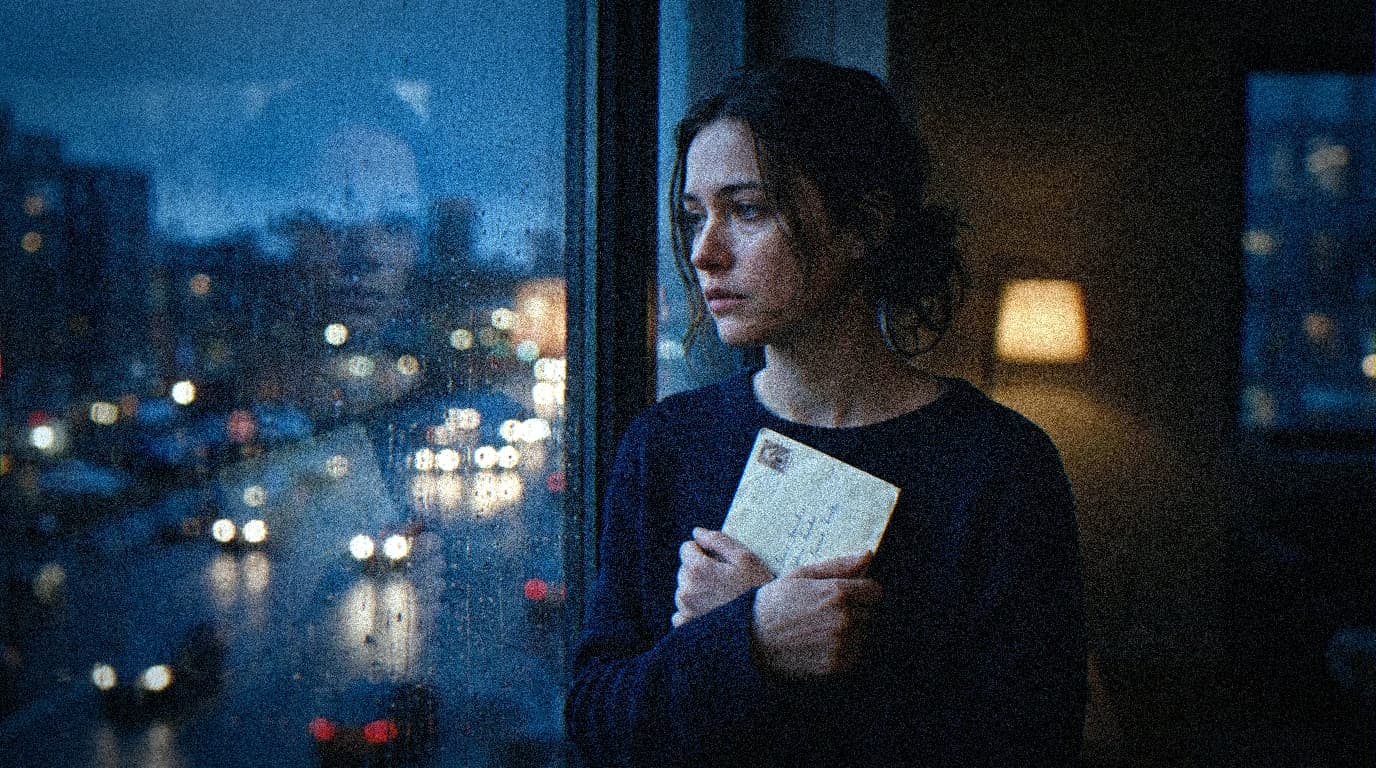
A strong visual narrative does not need to speak. It shows. It suggests. It makes you feel.
In AI, it is even often more effective. Long dialogues quickly expose the limits of sync and rhythm. A well-thought-out visual narrative holds better, especially in short format. To build this logic, also lean on how to write an effective script for an AI-generated video.
5 narrative tools with no dialogue
- a meaningful gesture
- an off-frame gaze
- a narrative object (letter, phone, key)
- a light change
- a cut on a decision
Prompt template
Mini visual structure
- Silent setup
- Visual tension
- Decisive gesture
- Consequence
| Mistake | Effect | Fix |
|---|---|---|
| Too many actions | confusion | simplify to one intention |
| No focal point | flat image | place a narrative object |
| Ending with no consequence | emotional void | show the after-decision |

Key things to internalize:
- the clarity of the intention
- the logical progression with no overload
- the way of making things understood without explaining everything
To maintain this narrative across several shots, combine with how to structure an AI video like a real film.
Trench warfare
- wanting to say everything in a single shot
- confusing mystery and confusion
- ignoring the emotional transitions
- overloading the image with objects
- forgetting the role of the cutting rhythm

Why narration with no dialogue is a superpower
When you remove the dialogue, you also remove a crutch. Everything must pass through:
- the frame
- the light
- the gesture
- the rhythm
- the ambient sound
At first, it is scary. Then you realize it is exactly what gives a more cinema, more universal, stronger render.
Pro insight Silence is not a void, it is a narrative space.
3 detailed beginner scenarios
Scenario 1, emotional mini ad with no voice
Goal: sell a feeling, not explain a product.
Classic mistake:
- overloading with on-screen text
- cutting too fast
- no visual progression
Fix:
- a central narrative object
- 4 clear beats
- a final gesture that validates the promise
Scenario 2, short dramatic scene
Goal: show a difficult decision.
Classic mistake:
- shots too beautiful but with no link
- no rise
- an unintentional ambiguous ending
Fix:
- a simple visual setup
- growing tension
- a readable decisive action
- an immediate consequence
Scenario 3, 20-second social teaser
Goal: capture fast with no talking.
Classic mistake:
- narrative confusion
- an aggressive style that parasites it
- music that crushes the image
Fix:
- a readable opening
- a clear visual progression
- minimal, rhythmic, contextualized sound
Ultra-granular workflow
Step 1, silent intention
Write the scene with no dialogue:
- who acts
- why
- what obstacle
- what final change
Step 2, turn it into beats
Break it down:
- entry
- tension
- shift
- consequence
Step 3, choose the visual signs
For each beat, one sign:
- gaze
- hand
- object
- displacement
- light variation
Step 4, prompts shot by shot
Keep the template strict and change only the action description.
Step 5, build the emotional arc
The rhythm must rise, then release.
Step 6, narrative sound
With no dialogue, the sound becomes essential:
- room tone
- micro foley
- targeted silence
Silent narration table
| Beat | Visual signal | Sound signal | Risk | Fix |
|---|---|---|---|---|
| Setup | readable wide frame | location ambience | too abstract | add a key object |
| Tension | off-frame gaze | breath/distant noise | confusion | simplify the frame |
| Shift | decisive gesture | sound rupture | forced effect | reduce the cut editing |
| Consequence | new stable frame | silence or release | vague ending | show a concrete impact |
Massive trench warfare
1) Confusing silence and slowness
Fix: silence can be nervous.
2) Too many symbols
Fix: one strong symbol is worth more than five weak ones.
3) No arc
Fix: each shot must advance the character's state.
4) Too much on-screen text
Fix: let the image tell the story.
5) Unreadable gesture
Fix: frame the main gesture clearly.
6) "Band-aid" music
Fix: ambient sound first, music next.
7) Interchangeable shots
Fix: give a unique mission to each shot.
8) Unintentional open ending
Fix: explicitly show what has changed.
9) Uniform rhythm
Fix: alternate breaths and tensions.
10) Emotion too "acted"
Fix: favor micro-expression and concrete action.
11) Off-frame badly used
Fix: orient the gaze and the light to make it meaningful.
12) Too many style variations
Fix: a stable visual charter across the whole scene.
13) Cutting before the impact
Fix: leave 0.5 to 1 second after the key gesture.
14) Non-localized audio
Fix: each sound must belong to the place.
15) Absence of narrative QA
Fix: an external test with a single question, "what did you understand?".
Practical case, a 30-second scene with no dialogue
Intentions
- solitude
- hesitation
- decision
Planning
- shot 1: entering the space
- shot 2: gaze toward an object
- shot 3: an interrupted gesture
- shot 4: resuming the gesture
- shot 5: a transformed exit
Expected result
The viewer understands the story with no word.
Hook, the frustration we see in production
You work hard. You test prompts. You launch local renders for hours. And in the end, you feel it does not hold like a real film.
The problem is not your general level. The problem is more precise: creating visual storytelling with no dialogue. As long as this brick is not solid, everything else stays fragile.
Here we are going to settle this concretely, set-oriented, edit-oriented, results-oriented.
Core concepts, what to lock before generating
Here is the minimal foundation to lock:
- emotional intention per shot
- clear visual hierarchy
- material and light continuity
- rhythm consistency between shots
- a consequence logic at the end of the scene
If a single one of these bases is missing, the credibility drops immediately. Even with a clean render.
Pro insight What makes it pro is not the complexity of the setup, it is the consistency of decision from start to finish.
3 detailed beginner scenarios
Scenario 1
A separation scene where nothing is understood with no voice-over. This case happens very often when you try to compensate for a vague intention with more style.
What breaks:
- no explicit shot mission
- too many parameters moving at the same time
- purely aesthetic validation
What fixes it:
- one mission sentence per shot
- one variable modified at a time
- a reading test with an external person
Scenario 2
An emotional teaser where all the shots are beautiful but mute. Here, the defect is not only technical, it is narrative.
What breaks:
- absent emotional progression
- inconsistent cuts
- loss of focal point
What fixes it:
- a wide-to-tight progression
- controlled gaze and light matches
- a radical simplification of the secondary elements
Scenario 3
A social media mini film where the dramatic progression disappears. The render may seem ambitious, but the viewer quickly feels the fabrication.
What breaks:
- texture too clean
- aggressive contrast
- movement or angle with no motivation
What fixes it:
- realistic material and micro imperfections
- sober grading
- a story-oriented shot choice
Practical workflow, ultra-granular method
Step 1, scene brief in 5 lines
Write:
- who acts
- what they want
- what stops them
- what shifts
- what changes at the end
Without this brief, no generation.
Step 2, fixed visual charter
Set from the start:
- 16:9 ratio
- dominant light logic
- grain level
- detail density
- material consistency
Step 3, recommended starting settings
| Parameter | Starting value | Why |
|---|---|---|
| Resolution | 1536x864 | balance of quality and speed |
| Steps | 28 to 42 | useful detail with no drift |
| CFG | 4.5 to 6.5 | strong but natural guidance |
| Seed | fixed per shot | reproducibility |
| Denoise img2img | 0.25 to 0.45 | controlled iteration |
| Upscale | x1.5 to x2 | clean finishing |
Step 4, production in passes
Pass 1, pure readability. Pass 2, emotion. Pass 3, material finishing. Pass 4, cut verification.
Step 5, quick human test
Show the sequence to someone who does not know your process. Ask three questions:
- what did you understand first
- which moment seemed fake to you
- what did you feel at the end
You adjust according to these answers, not according to your attachment to a shot.
Step 6, stabilization pass
- remove the beautiful but useless shots
- realign the weak shots with the intention
- harmonize the material
- tighten the rhythm
Step 7, final check
Checklist:
- readable with no sound
- credible at normal speed
- consistent frame by frame
- clean on mobile and on a large screen
Trench Warfare, what beginners do wrong and how to fix it
- Generating too fast, correcting too late. Fix, write the intention before launching the slightest render.
- Chasing a style instead of a story. Fix, each shot serves a narrative verb.
- Too many variations at the same time. Fix, one variable per iteration.
- Keeping weak shots because they are pretty. Fix, cold elimination.
- Forgetting the edges of the frame. Fix, a systematic edge-to-edge scan.
- Inconsistent lighting. Fix, a stable main source.
- Artificial skin or fabric material. Fix, material prompts and subtle post.
- Contrast pushed too far. Fix, come back to a realistic curve.
- A clip editing rhythm. Fix, cut on intention.
- No final emotional consequence. Fix, the last shot must transform something.
- No settings log. Fix, record seed, cfg, steps.
- Solo validation only. Fix, a short external test.
- A set too cluttered. Fix, remove the visual competitors.
- Monotonous shot scale. Fix, a structured progression.
- Neglected eye-line match. Fix, a gaze map before export.
- Inconsistent focal lengths. Fix, a scene focal charter.
- Too much post to save a weak shot. Fix, correct at the source.
- Overloading the prompts. Fix, dense, prioritized sentences.
- Forgetting the sound narrative. Fix, ambience and narrative accents from the pre-edit.
- Not reviewing the render the next day. Fix, mandatory cold validation.
FAQ
Foire aux questions
Réponses rapides aux questions les plus fréquentes sur cet article.
Do I have to be an expert to apply this method
No. You mostly have to be rigorous. The method is designed for motivated beginners. If you apply the steps in order, you will quickly produce more readable and more credible results.
Why do my renders stay fake despite good local models
Because credibility does not come from the model alone. It comes from the intention, the consistency of choices, the material, and the cuts. A powerful model amplifies your qualities as much as your mistakes.
How long does it take to see real progress
With short, disciplined daily practice, often in one to two weeks you see a clear jump. The secret is to repeat comparable cases and to note what works.
How do I avoid getting lost in the settings
Set a base preset then touch a single variable per pass. It is the fastest way to understand the real effects of your choices.
What simple test guarantees better readability
The 2-second test. You show a shot very briefly, then you ask what the person saw and felt. If the answer is not aligned, your shot must be simplified.
Should I favor realism or style
You must favor readability then consistency, and only then style. Without readability, style looks like a filter. With readability, style becomes a signature.
Advanced workshop, telling a story with no line of dialogue
You want the audience to understand everything with no voice-over. This workshop forces you to structure intention, action, consequence, only through the image and the rhythm.
Module 1, strict preparation
Duration, 30 minutes.
You write a single scene sheet with:
- the main emotional goal
- the secondary stake
- the expected progression
- the fixed technical constraints
- the non-negotiable failure criteria
This document must stay visible during the whole work. As soon as you deviate, you go back to the sheet.
Module 2, controlled batch production
Duration, 90 minutes.
You produce short batches, never uncontrolled marathons.
- batch A, a sober version
- batch B, a more tense version
- batch C, a more intimate version
You compare according to a single grid, not according to the impression of the moment.
Module 3, cold review
Duration, 20 minutes.
You step away from the screen for five minutes, then you come back with this checklist:
- instant readability
- material consistency
- visual continuity
- emotional progression
- overall feeling of naturalness
If two criteria fall, you do not finalize.
Module 4, test delivery
Duration, 15 minutes.
You export a short cut and have an external person watch it. You note their feedback word for word, with no arguing.
Only then do you correct.
Quick decision table
| Situation | Beginner reaction | Pro reaction |
|---|---|---|
| A shot is beautiful but inconsistent | keep it | delete it |
| The render is too clean | add effects | correct material and light |
| The narrative is vague | generate more | simplify the structure |
| The edit is soft | speed up everywhere | reinforce the shift points |
| The emotion does not come through | push the grading | correct the shot direction |
Complementary trench warfare, 10 silent mistakes
- You validate too fast when it is pretty. Fix, a mandatory comprehension test.
- You adjust the color instead of the meaning. Fix, correct the intention first.
- You accumulate versions without deciding. Fix, the rule of 3 variants max.
- You forget the mobile effect. Fix, check on a small screen too.
- You use vague words in the prompts. Fix, concrete, visible verbs.
- You confuse density and disorder. Fix, prioritize the elements.
- You do not note the winning settings. Fix, a minimum production log.
- You correct in post what should be corrected in generation. Fix, go back to the source.
- You ignore decision fatigue. Fix, short sessions and clear goals.
- You deliver with no break. Fix, cold validation the next morning.
Complementary FAQ
How do I know I am really ready to publish
When the sequence is understandable with no explanation, visually stable, and emotionally readable by an external person. If you have to explain your intention a lot, the render is not ready yet.
I am short on time, what is the minimal version of the method
Do three things, a 5-line brief, production in 3 batches maximum, a 2-minute external test. This trio is already enough to avoid the most costly mistakes.
How do I keep a personal signature without falling into cliché
The signature comes from the coherent repetition of useful decisions, not from an aggressive visual effect. Choose a light register, a rhythm, a way of framing, then hold it across several projects.
The biggest lever to progress in 30 days
The review discipline. Produce less, observe better, correct precisely. It is less spectacular in the moment, but it is what gives you a real, durable level.