How to Create a Storyboard with AI Step by Step
To create an AI storyboard step by step with no plastic render or decorative gallery: script breakdown, visual bible, stable prompts, sequential QA and a production deliverable.
You open your image tool. You ask for "ultra-realistic cinema storyboard". You get twelve brilliant frames that do not tell the same story as your script. The faces slide between two shots. The light jumps with no motif. And that "catalog" skin, that infusion of artificial sharpness: you recognize the classic symptom of the plastic render that flatters an isolated capture then lies in the edit.
This guide answers a precise question: how to create an AI storyboard step by step with a set method, not with a technology demonstration. The goal is not to replace a storyboard artist with a generator. The goal is to go faster without betraying the direction, without sacrificing the cuts, and without delivering a document nobody can shoot or generate cleanly afterward.
If you already want a macro vision of a complete client deliverable, link this thread to generating a complete professional storyboard with AI. If you prefer the "film grammar before pixels" angle, open in parallel AI storyboarding: cinematic vision. Here, we stay closest to the field: frame by frame, decision by decision.
The number one mistake: confusing moodboard and storyboard
A moodboard seduces. A storyboard directs. The difference shows up at the moment someone asks you how many seconds the shot lasts, where the camera goes, and what the risk is if the location does not look like the image.
When you create an AI storyboard step by step with no framework, you often fabricate a collection of "cool" angles. It is pleasant on a feed, useless on a shooting schedule. The useful storyboard answers dumb questions: what changes from one frame to the next, why this shot exists, how it fits into the axis, what emotion a twelve-year-old must read without reading the dialogue.
AI speeds up the production of images. It does not automatically install the discipline of the 180° axis, the consistency of the light sources, or the stability of the costumes. These laws come from you. The model is an engine. You are the director holding the chainsaw, not the forest that grows on its own.
Before frame 01: what your script must already contain
You cannot storyboard a vague intention. If your text says "heavy mood" with no action or visible stake, the AI storyboard becomes a style contest. Work your script until it gives you at minimum: who wants what, who blocks what, what physical gesture betrays the truth.
For the complete editorial layer before the breakdown, how to write a short film script with AI from A to Z stays a useful ramp if you have to lock the structure, dramatic pivots and playable silences.
Then, set three anti-plastic guardrails from the preparation:
- List of visual prohibitions: no smoothed cheap-ad skin, no impossible contrasts, no gaze toward the wrong interlocutor.
- Main axis per scene: a line of action readable even on a freehand sketch.
- Named light sources: north window, magenta neon as a backlight, halogen lamp at the back: it does not matter as long as you repeat the same words in your prompts.
Without these three elements, you will spend your days "correcting a mood" while your problem is geographical or dramaturgical.
Step 1: break the script into shootable units (not into sentences)
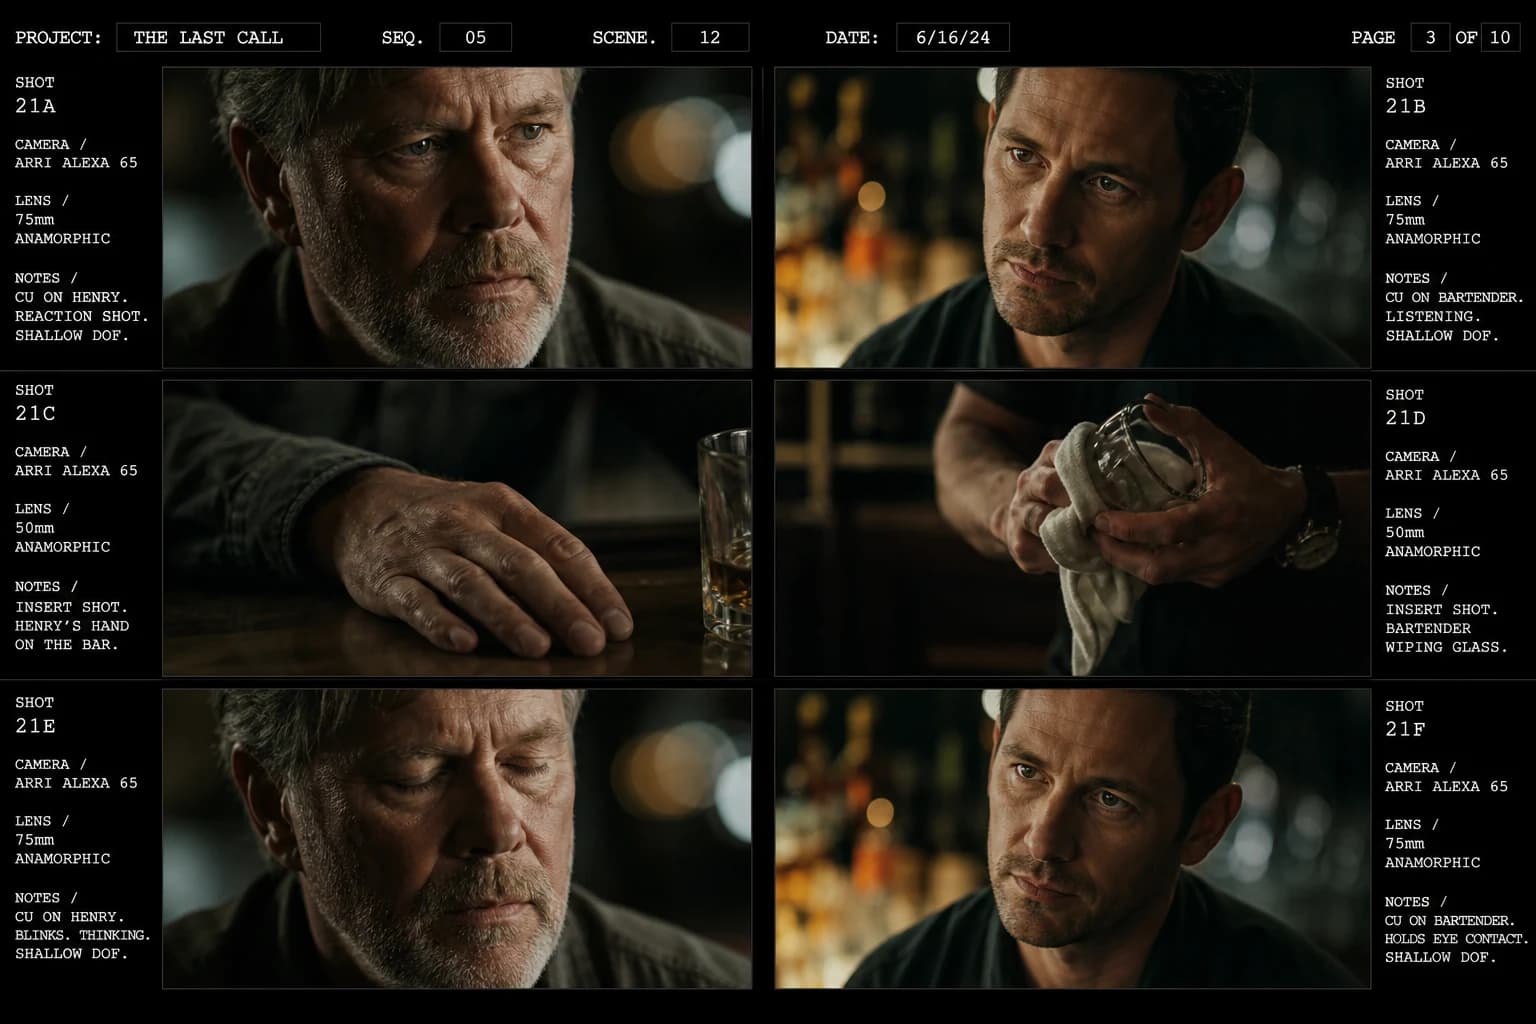
A dialogue sentence is not a shot. A line of action can require three angles to be readable. Your first deliverable is not an image: it is a numbered list with a stable naming convention like S03-P07 (scene 03, shot 07).
For each line of this list, write five fixed fields:
- Function: establish, confront, reveal, underline, breathe.
- Indicative duration: even approximate, it imposes a rhythm decision.
- Shot size: wide, medium-wide, medium, medium close, close-up.
- Camera movement: fixed, light pan, modest push (avoid impossible tracking shots until you have validated the geography).
- Emotional proof: what a viewer must believe with no subtitles.
If you cannot fill "function" in four words, you are not ready to generate. You are asking the model to do your director's job.
Step 2: build a local bible before the long prompts
The bible is not a novel. It is a short copy-pasteable sheet. Character: ten lines max. Place: eight lines max. For a series of shots with the same hero, stability beats poetry.
Synonyms are your enemies. If you go from "beige trench coat" to "sand overcoat", you invite variance. Choose a canonical wording and repeat the same string in each concerned prompt.
For teams that push the "same face everywhere" consistency, Nano Banana workflow for consistent characters details a chain of sheets and QA that transposes very well to the storyboard: same spirit, different deliverables.
During this phase, generate three to five anchors per character and per place before tackling the complete sequence. A failed anchor now costs ten broken shots later.
Step 3: storyboard prompt architecture (always the same order)
You will save a stupid amount of time if you stabilize a template. Recommended order:
- Frozen identity (character and place from the bible).
- Precise action of the body or the gaze (not "he is sad", but "low shoulders, hands letting go of the cup").
- Framing and focal length as intention ("soft compression", "natural perspective", or a mm equivalence if you master it).
- Motivated light with direction (key and backlight in simple sentences).
- Anti-plastic image texture: light grain, visible pores where it is human, owned local imperfections.
- Explicit prohibitions: no caricatural HDR, no global digital beauty, no eye morphing.
This skeleton aligns your work with an industrial intention: you compare shots that change for a good reason, not for a fluctuation of the model.
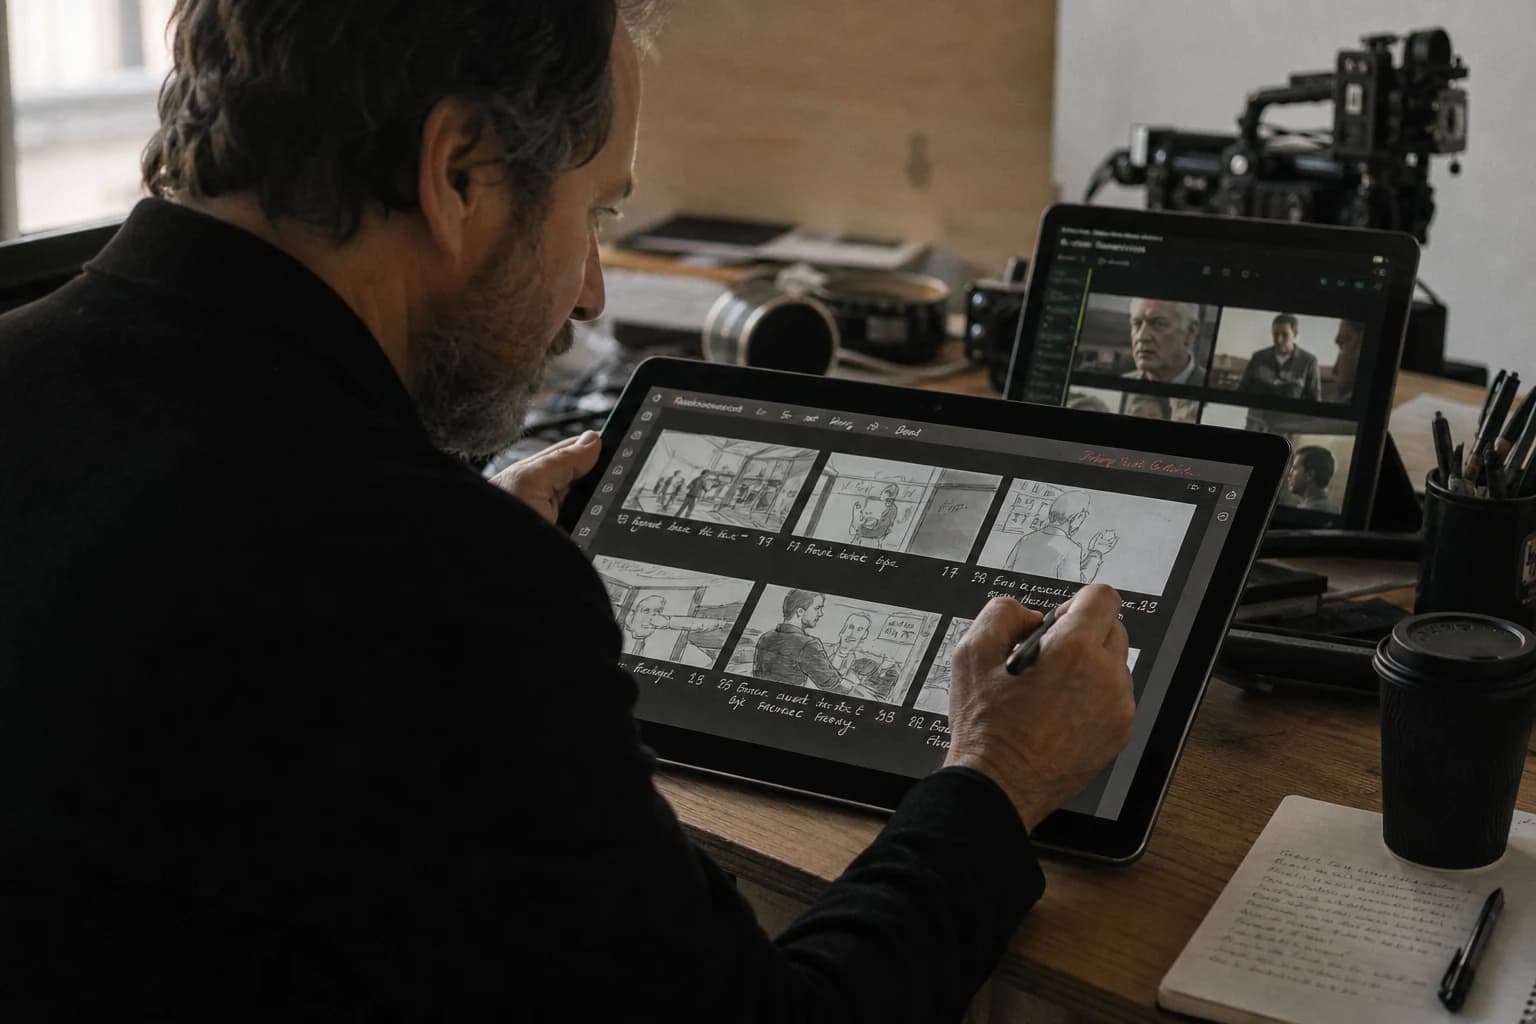
Step 4: generate small, choose fast, document always
The strategy that works in the field is to produce three variants maximum per shot at the start. You select. You note in a text file: seed if relevant, useful settings, the reason for the choice in one line.
The marathon sessions where you "glue" two hundred images with no log end in a versioning nightmare. Your future self will hate your optimistic past.
When a variant is "better" but weakens the continuity, you throw it away. Sequential consistency takes priority over the isolated postcard.
Step 5: annotate as for a real set
An image with no metadata stays an illustration. Add under each frame at minimum:
- shot code (
S03-P07) - target duration
- intention for the actor or the camera operator in one sentence
- technical risk (mirror, crowd, physical action)
- plan B if the generation or the location refuses the movement
It is this layer that turns your PDF into a tool. It also avoids the dispersion where each collaborator interprets a beautiful image their own way.
Step 6: mandatory sequential reading (rudimentary animatic)
Export a timeline even rough: even approximate durations, temporary sounds possible. The errors jump out at you in the succession that you neglect in the gallery.
Quick tests to do:
- spatial readability: do we understand where the characters are?
- dramatic breathing: does everything scream at the same volume?
- gazes and line of action: does the social geometry read with no oral guide?
If you observe a phantom rupture between two magnificent frames, it is not "a detail". It is a storyboard error that would have cost a day at the shoot or three generative round trips.
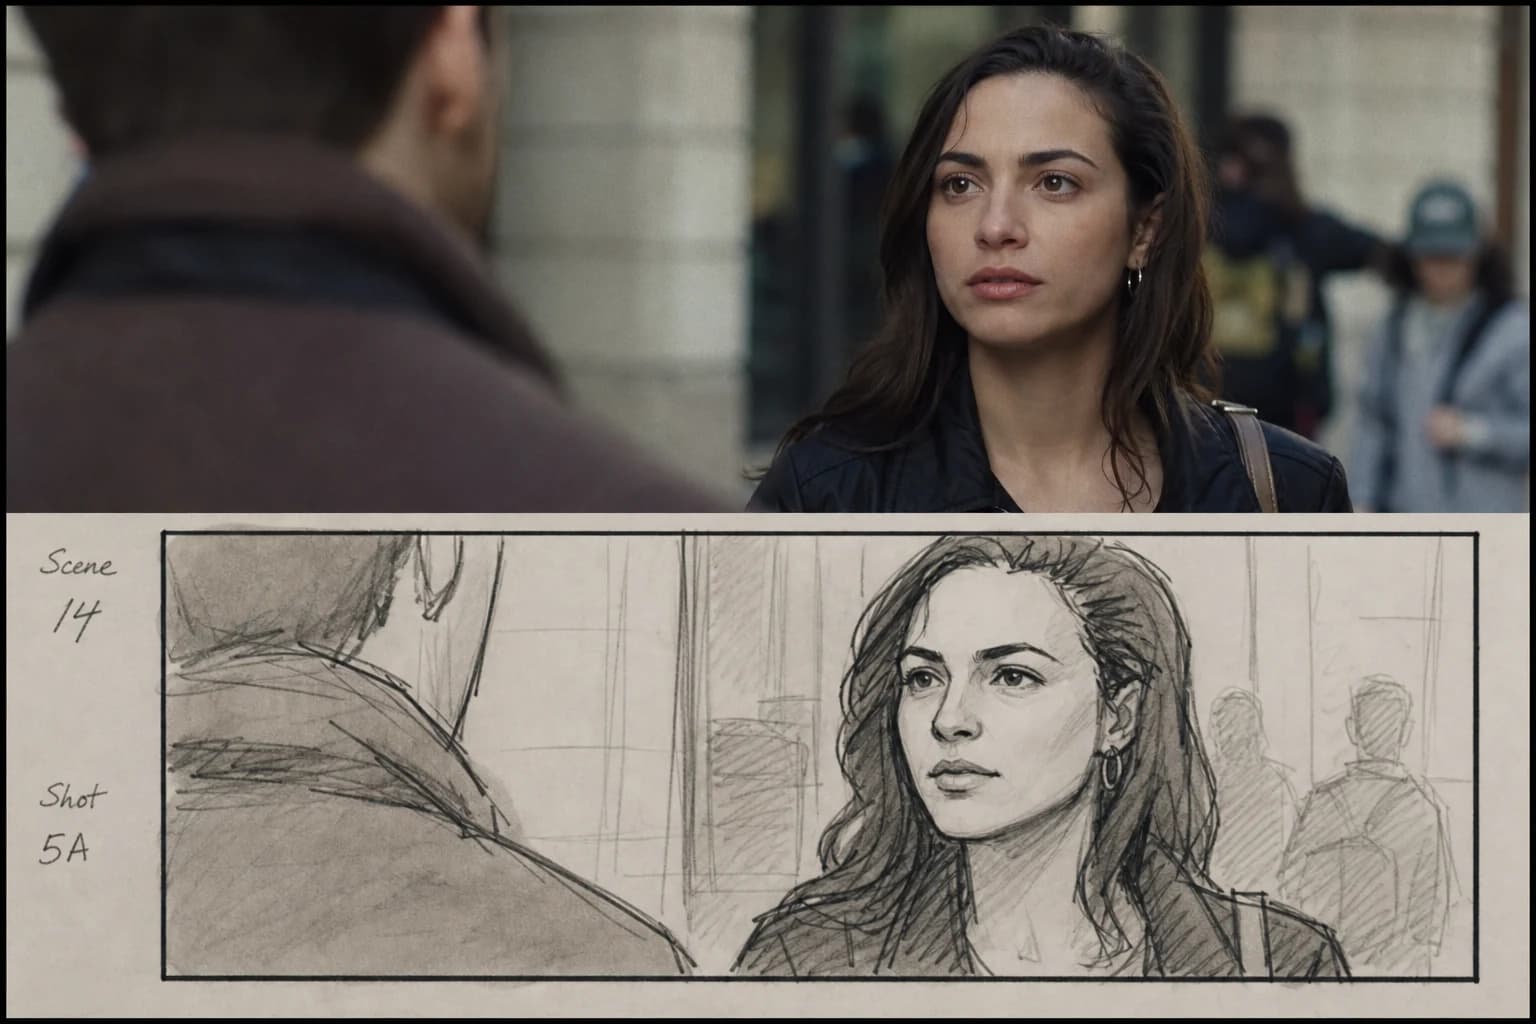
Table: quick diagnosis when a shot "does not pass"
| Observed symptom | Probable cause | Priority fix |
|---|---|---|
| "Wax" or too-smooth face | aesthetic overload / implicit beauty | clearer prohibitions + skin texture + side light |
| Costume jump between frames | synonyms in the prompts | go back to the bible word for word |
| Same shot size everywhere | absence of a function per frame | rewrite the function then reframe |
| Sets that pivot | no architectural anchor | add three geometric invariants in each prompt |
| "We do not know who looks at whom" | unconstrained gaze axis | correct the direction of the pupils and the position of the bodies |
| Beautiful but narratively unreadable image | decorative with no stake | remove or merge with an anchor shot |
Realistic frequencies and workload
For a short format, a page of script does not translate linearly into a number of frames. A dialogue scene can require few angles if the acting carries the text. An action scene can explode the coverage if you have to clarify the geography.
An honest range for an indie project: between 30 and 90 frames depending on ambition, but only after sorting. The good AI storyboard grows then slims down: you remove the redundant shots when the sequential reading reveals the emotional duplicates.
Work in batches of five to ten noted and validated shots before the next wave. It is slow at the start, exponentially faster after the anchors stabilize.
Frank's Cut: three set truths adapted to the generative
First truth. If you validate a frame without its neighbors, you build a narrative line with ruptures invisible until the edit. Always judge blocks of three to five shots, not isolated captures.
Second truth. Limit a single variable per iteration when you debug a drift: either the light, or the costume, or the framing. If you modify three parameters between two renders, you will not know what saved the image.
Third truth. Refuse the quantity fascination. Thirty mediocre shots beat your technical ego; six clean shots with annotations beat your real schedule.
Local AI chain vs cloud chain: how to choose with no dogma
You can storyboard with a fast cloud pipeline or with a more verbose local stack. The question is not "which is the best model", but "where do you master the repetition".
Pragmatic criteria:
- a need to reuse a character across ten shots on the same day: priority to the tools where you can freeze references and targeted regenerations
- a need for discretion on the content: local or enterprise contracts first
- a need for team handoff: clean PSD or PNG exports, layers if necessary, stable naming
If you change chain every two days, you compare oranges and tractors. Choose one chain for the storyboard phase and hold the line until the sequential validation.
External references to name and structure with no artistic bullshit
For the image vocabulary and the pre-production notions without going through Instagrammable jargon, two useful foundations:
- American Society of Cinematographers to go deeper into the language of light and photographic intentions seriously.
- StudioBinder for the storyboard logic and production checklist on the method side.
If you have to lock the shot grammar and transitions without slipping into hollow theory, the educational zone of the British Film Institute also helps stabilize the terms you reinject into your prompts.
Keep these reads as a framework, not as a distraction: two tabs instead of twelve YouTube channels talking at the same time.
Final deliverables that respect a real team
In the end, you must be able to deliver:
- a paginated PDF with shot codes readable even printed in black and white.
- a sources folder with PNG/WebP named by shot code (not by "really final final version").
- a text file or spreadsheet with a minimal changelog: what was removed and why.
You can then move to an animated previsualization or a video extraction depending on your pipeline. The AI storyboard is not the end of the film: it is the moment when the fiction becomes shareable geometry.
FAQ: creating an AI storyboard step by step without trapping your project
Should I storyboard every line of the script?
No. You storyboard the moments where the staging carries the information. Some dialogues hold on two powerful shots if the acting and the tension are centered on the faces. Other passages require five angles to clarify a geography or a series of physical actions. The granularity depends on the narrative function, not on the number of written sentences. Use a "minimal viable" pass then add angles on demand of the gaps spotted in the sequential reading. This discipline avoids the decorative boards that impress then tire the team at the moment of real choices.
How much time should I plan for a first realistic AI version?
For a short film of a few minutes, a serious first pass often takes one to three days depending on the number of locations and the stability of the characters, excluding the script rewrite. This time includes anchors, three variants per critical shot, annotations and a rudimentary animatic. If you compress too much, you will pay it in the edit or on set with inconsistencies visible too late. A well-oiled team goes down the curve after two projects because the bibles are recyclable and the prompt templates reused almost identically.
How do I avoid the plastic render on storyboard portraits?
Combine three levers rather than a magic prompt: explicit prohibitions against global digital beauty, motivated side light with a named stable source, local human textures that accept pores and controlled irregularities. Avoid caricatural HDR and over-pulled edges in post on the board if you then have to match with real footage or another generative chain. When an image "shines" too much to be honest in a cold dramatic scene, your eye is right: correct before validating the frame.
Can you storyboard before having a definitive cast?
Yes if you set silhouettes and intentions rather than precocious biometric doubles. Work with consistent physical archetypes ("stocky silhouette, shaved hair", not a named celebrity). When the cast arrives, methodically replace the anchors without changing the geometry of the axes or the dramatic function of the shots. Also document the "open" zones: apparent age, general morphology, deliberately flexible traits to avoid photo promises that are too precise too early. If you attach a precise photo identity too early with no legal validation or consents, you also create non-technical risk that can invalidate a whole marketing or festival cycle later.
How do I know if my camera axis is good without drawing by hand?
Place two constant spatial landmarks in the scene: a wall with a window, an identifiable lamp, a step or a line on the floor. Across three successive shots, check that these landmarks stay on the right side relative to the line of action you set. If the window mysteriously jumps behind a character who does not pivot, your axis lies. Correct with prompts that explicitly reinject these landmarks or with a paper diagram even an ugly one before going back to the generator.
What do I do if the AI refuses an ambitious camera movement on a frame?
Note a static plan B that saves the narrative reading without the initial virtuosity. Often a stable wide shot with a later cut says it better than a chaotic tracking shot that will destroy the hands or the edges in the edit. You can also split: two fixed frames linked by an editing indication rather than a trajectory impossible to stabilize in the generative. For the downstream video pipelines, preparing this alternative on the board avoids technical blocks at the moment when scheduling becomes violent and costly. If you insist on the movement, reserve it for the passages where the geography and the silhouettes are already locked by solid anchors on the adjacent shots.
How do I collaborate with someone who does not read the prompts?
The human deliverable stays the annotated PDF and a short presentation in a meeting: function shot by shot, risks, durations. The prompts are your internal kitchen. Add a one-page sheet with a minimal glossary: shot sizes, direction of the movement, "risk" entries so the questions are about the reading and not about the tech. As long as the frames carry codes and intentions readable by a set team, you keep the social peace and you avoid endless discussions about CFG or seeds useless at this stage. Version the exports with a date and a stable suffix to avoid the phantom attachment.
Does this workflow also work for a purely generative project with no camera shoot?
Yes because you keep the same reading laws: credible geography, rhythm, clear intentions. The difference is in the technical risk column and in the alternatives if the physics refuses a pose. You then mostly anticipate the animation consistency collisions: hands, hair, fabrics, perspectives during the image-to-video passages. Your viewer stays human with the usual cinematic expectations: help them with frank decisions and a continuity that does not depend on the model's miracle between two adjacent shots. The storyboard stays your internal contract even if no physical camera passes on a traditional set.