Creating Reusable AI Post-Production Presets
How to build robust presets that accelerate projects without uniformizing every render.

You apply a "cine" LUT on twenty AI shots. Twenty orange tints, cadaverous faces, screaming skies. The preset is not the problem: it is the preset badly calibrated for AI footage.
Creating reusable AI post-production presets demands a modular architecture: correction, skin, grain, light look. Not a single magic click. This guide shows you how to build a library that accelerates without crushing the diversity of your shots.
Why classic cine LUTs break AI footage
Camera-shot footage obeys a relatively stable capture curve. AI footage obeys an engine that changes according to the prompt, the seed, the model version. Applying a LUT designed for camera log onto AI often amplifies already-present flaws: plastic skin, overexposed sky, violet shadows.
The reusable presets for AI must be modular and low in intensity. Each layer corrects an identified debt. The next layer does not compensate for a previous badly-set layer.
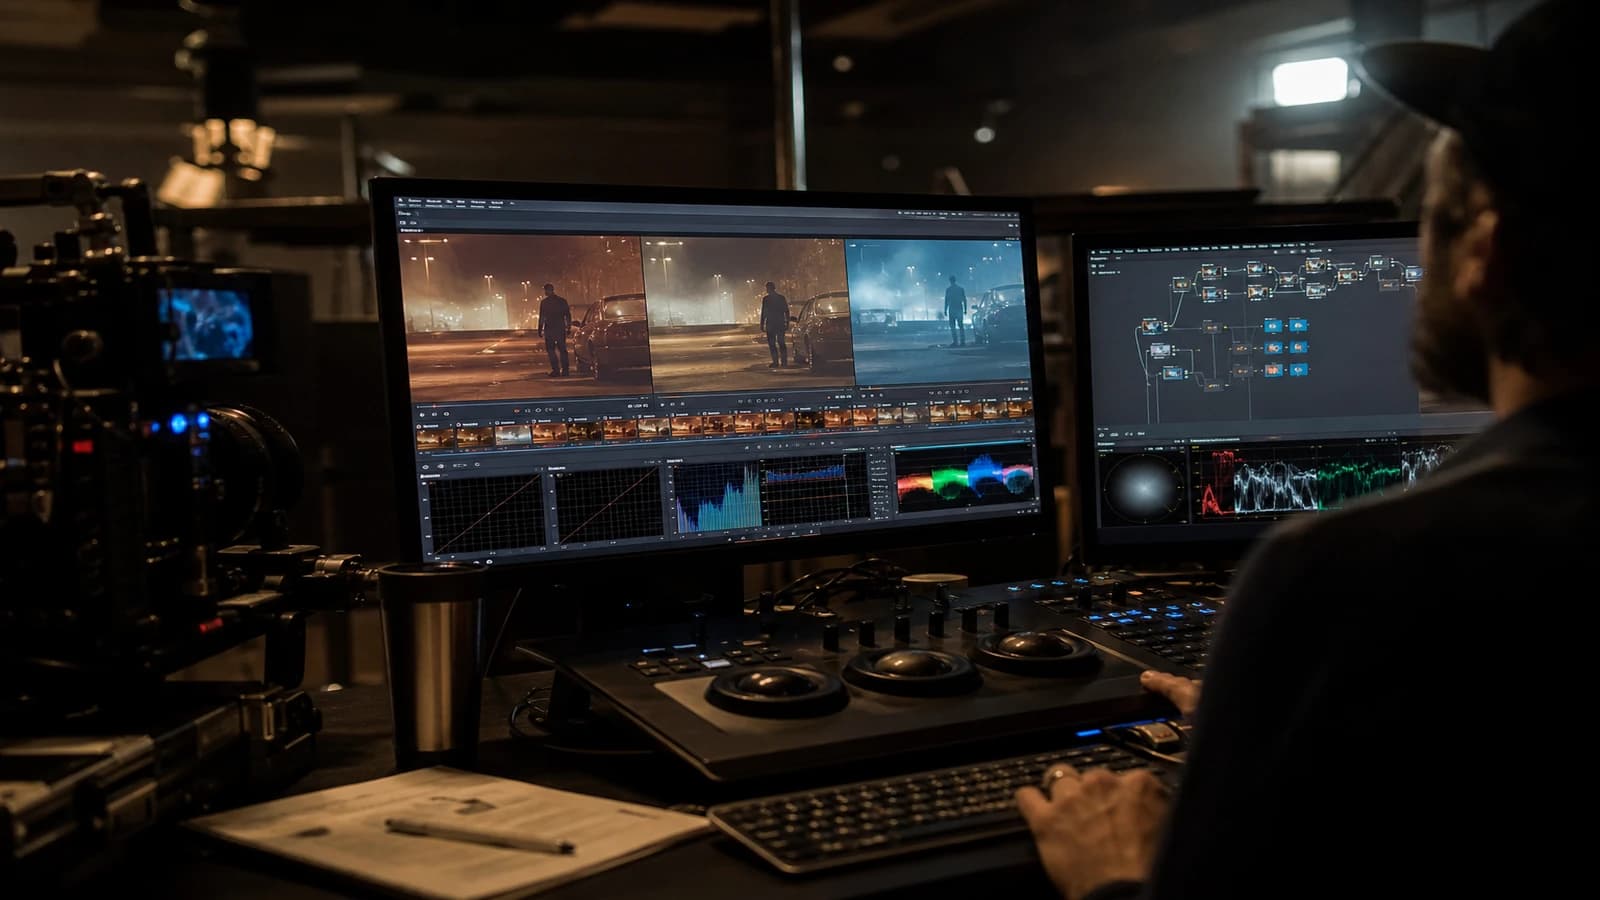
Recommended architecture in four nodes or layers:
- Normalization: white balance, adjustment of the blacks and the highlights with no creative look.
- Skin: soft mask, selective desaturation of the aggressive reds, slight luminance lift.
- Grain: harmonization of the too-clean textures between shots.
- Look: stylistic LUT or curve at 20-40% intensity maximum.
| Preset layer | Role on AI footage | Frequent mistake |
|---|---|---|
| Normalization | Equalize the base before style | Skip and go straight to the LUT |
| Skin | Avoid AI orange/magenta | Full LUT on faces |
| Grain | Glue the shots together | Heavy grain that masks the artifacts |
| Look | Light signature | 100% look on all shots |
For the grading base, lean on how to grade an AI video in DaVinci Resolve and how to correct the colors of an AI video.
Building your preset library step by step
Step 1: choose ten reference shots
Not your best shots. Your representative shots: interior day, exterior night, tight face, wide shot, neon, nature, light skin, dark skin. If your preset holds on these ten, it will hold on a short film. If it only holds on a hero shot, it is a decorative preset, not a tool.
Step 2: create the normalization preset
On each reference shot, note what diverges before any look: temperature, tint, shadow lift. Build a PowerGrade node that brings the shots toward a common neutral base without crushing the dynamics. Export AI_Normalize_v01. Test on the ten shots. If a shot breaks, that shot leaves the global preset or receives a documented variant.
Step 3: separate skin preset
Qualified mask or HSL on the red/orange skin. Lower the saturation 10 to 25% depending on the engine. Lift the luminance slightly if the AI faces are waxy. Name it AI_Skin_Fix_Light. Do not mix skin and sky in the same node. The sky has its own treatment.
Step 4: harmonizing grain
Same grain family on all the shots: fine 16 mm for fiction, coarser for docu if that is your world. The grain hides the AI micro texture differences between adjacent shots. Stay light. If you see the grain before the image, it is too much. Test on mobile: the grain often disappears on a phone, so validate on two screens.
Step 5: optional weak look
LUT or creative curve. Intensity 20 to 40%. A look preset named AI_Look_TealSoft_30 is better than a "BLOCKBUSTER.cube" at full power. Document on which shot types it works. Exterior night yes, candle interior maybe no.
Step 6: package and version
A Presets_AI_ProjectX_v01 folder with .drx or .look depending on Resolve, plus a one-page PDF: node order, intensities, reference shots used. When you change a slider, v02. Never "final_final".
Scenario A: 15s ad series, twelve shots, one post day
Normalization applied in batch on the twelve. Skin fix on the three shots with a face. Global grain. Look at 25% on the whole. Manual adjustments only on two B shots. Time gain: four hours instead of eight. Consistency: the shots follow each other with no temperature jump.
Scenario B: short film, two day/night sequences
Two packs: AI_Day_v01 and AI_Night_v01. Same grain, different looks. The normalization can be shared. Do not force a single day-night LUT: you gray out the night or you burn the day.
Scenario C: client changes engine mid-project
The Runway shots and the Kling shots do not have the same color signature. Normalization preset per source (AI_Norm_Runway, AI_Norm_Kling), then common skin/grain/look layers. The modularity saves you when the technical stack changes.
Troubleshooting: when your presets betray the project
Orange faces after the look preset. The look is too strong or applied before the skin fix. Order: normalization, skin, grain, look. Lower the look intensity on the face shots via a secondary key.
Adjacent shots no longer match. The preset was created on a single engine or a single version. Back to the ten reference shots. Split by source if necessary.
Muddy grain on a calibrated screen. You compensated for a too-bright screen. Test on a neutral monitor and on mobile. Reduce the intensity.
Preset "uniformizes" too much. It is the sign of a single look at 100%. Reduce the intensity or limit the look to the sequences where the stylization is wanted. Presets accelerate, they do not replace the director's choices.
Web export destroys the preset. Aggressive compression on already-fragile AI highlights. Plan a slight highlight rolloff in the normalization preset. See how to go from an amateur render to a cinema render in AI for the complete chain.
Preset created on a too-saturated laptop screen. Everything looks good on yours, dull on the client's. Fix: grade on two screens or export a reference to a neutral iPad. Document the screen profile used at calibration.
Nodes in the wrong order after import. The skin fix before the normalization creates zombie tints. Fix: an order checklist stuck on the monitor. Normalization, skin, grain, look. Always.
Maintaining the library over six months
AI presets age when the engines change. Plan a quarterly review: regenerate five reference shots with the current versions of the tools, reapply the presets, note the gaps. If the normalization no longer holds, fork v02 without deleting v01. The old projects may still need it.
Document in a README: calibration date, engines tested, intensities per node, before/after captures. A preset with no doc is a mystery file you will avoid in six months out of fear. The documentation time is paid back at the first ad series where you reuse the stack.
Share the library across the team via a versioned cloud folder, not by email attachment. The .drx and LUTs multiply otherwise. A preset owner validates the additions. The editors propose, the owner merges. Otherwise you end up with twelve nearly identical AI_Skin_Fix variants.
When you deliver a client project, attach the preset version used to the deliverable folder. The client who comes back six months later for a pick-up must be able to find the same chain. It is professionalism, not bureaucracy.
💡 Frank's Cut: name by function (
AI_Skin_Fix_Light), not by director. You will find what works in six months.Nolan_Vibetells you nothing when you must deliver a cosmetics ad.
The Blackmagic DaVinci Resolve PowerGrades doc details the export and import of grades. For the science of LUTs, Colour Science for Film and Video stays a reference, even if you simplify for AI.
FAQ
Foire aux questions
Réponses rapides aux questions les plus fréquentes sur cet article.
Resolve, Premiere or After Effects for AI presets?
DaVinci Resolve for modular grading and reusable PowerGrades. Premiere for fast Lumetri presets if the team is already in it. After Effects for the looks with grain and vignette on isolated short shots. What matters is the order of the layers and the naming, not the tool. Export LUTs only when you must move between apps. If your team mixes Resolve and Premiere, create the normalization and the skin fix in Resolve, export 33x33 LUTs for Premiere, keep the weak look last. Test the conversion: some LUTs lose precision on the already-fragile AI skins.
What intensity for a look LUT on AI footage?
20 to 40% as a general rule. Raise progressively shot by shot. Beyond 50%, the AI faces suffer. If you must go to 80% for it to "look like something", the problem is in the generation or the normalization, not in the LUT. Note the intensity used per shot in the Resolve metadata or in a text file linked to the project. At the pick-up, you do not guess. You reapply AI_Look_TealSoft_30 and you only adjust the documented exceptions.
How to create a skin preset with no manual mask on each shot?
Use a wide HSL qualification on the orange and red skin, refine with a restrictive hue window after testing on three different skin tones in your reference shots. Export the node as a PowerGrade. On a shot where the mask catches the wood or the sand, adjust locally without changing the global preset. The skin preset is a starting point, not a blind finish. The shots with strong neon light often demand a second light manual pass on the cheeks.
Do you need a preset per generation engine?
Ideally yes for the normalization layer. The skin, grain and look layers can be shared if you have calibrated them on multi-source reference shots. Document which model version served the calibration. An engine update can invalidate the normalization without touching the grain.
How not to uniformize all the renders of a project?
The preset covers the consistency, not the identity of each scene. Keep named exceptions: dream scene, flashback, ad within the fiction. These sequences have a separate preset pack or no look, only normalization. Write the exceptions on the edit sheet.
Can you sell or share your AI presets?
Yes if you built them on your work. Specify for which engines and which shot types they are calibrated. A "universal AI" preset sold as magic is a scam. The value is in the documentation and the reference shots, not in the file alone.
Grain before or after the LUT?
After the normalization, often before or after the look depending on the render. Test on two shots. Grain before the LUT: the look colors the grain, more organic. Grain after the LUT: more neutral grain. AI often needs the grain to unify before the light look. Try grain then look at low intensity first.
Do presets replace a shot-by-shot grading?
No. They reduce the work on the A shots. The B shots and the heroes still receive manual work. A preset that eliminates 70% of the shot-by-shot time is a success. Aiming for 100% automatic on AI is aiming for mediocrity.
How to test a new preset before imposing it on the client?
Apply it to the ten reference shots. Show before/after in a grid. Have the skin validated in close-up. Test a compressed YouTube-type export. If the client validates on zoomed stills and on a compressed preview, you can launch the batch.
Long scenario: eight-episode web series
You calibrate the presets on the pilot episode. Each following episode reuses the stack with manual adjustments on the B shots only. Between episodes, you do not recreate the presets unless the generation engine changes. If a new episode introduces a neon place not present in the pilot, you add a documented AI_Night_Neon_v01 variant, you do not modify the day preset that already works.
The showrunner sees the consistency. The colorist keeps their sanity. The client who orders episode 7 benefits from the calibration work of episode 1. That is where AI presets become a commercial asset, not a personal shortcut.
Archive at each episode end a "preset snapshot" export: a copy of the PowerGrades + a screenshot of the nodes with intensities. If a freelancer takes over the edit on episode 9, they do not reinvent your chain from scratch.
The modular presets also work for the solo creators who publish every week on YouTube. You do not need a team to benefit from the normalization and the skin fix. You need discipline: same stack on ten videos, manual adjustments only on the shots that scream. Your audience feels the consistency before knowing why. It is the same logic as a channel's visual identity, applied to AI footage that drifts by nature.