Neon Night: Credible Skin With No Magenta Bath
Neon / skin balance, selective saturation and LUT for night shots that stay human.
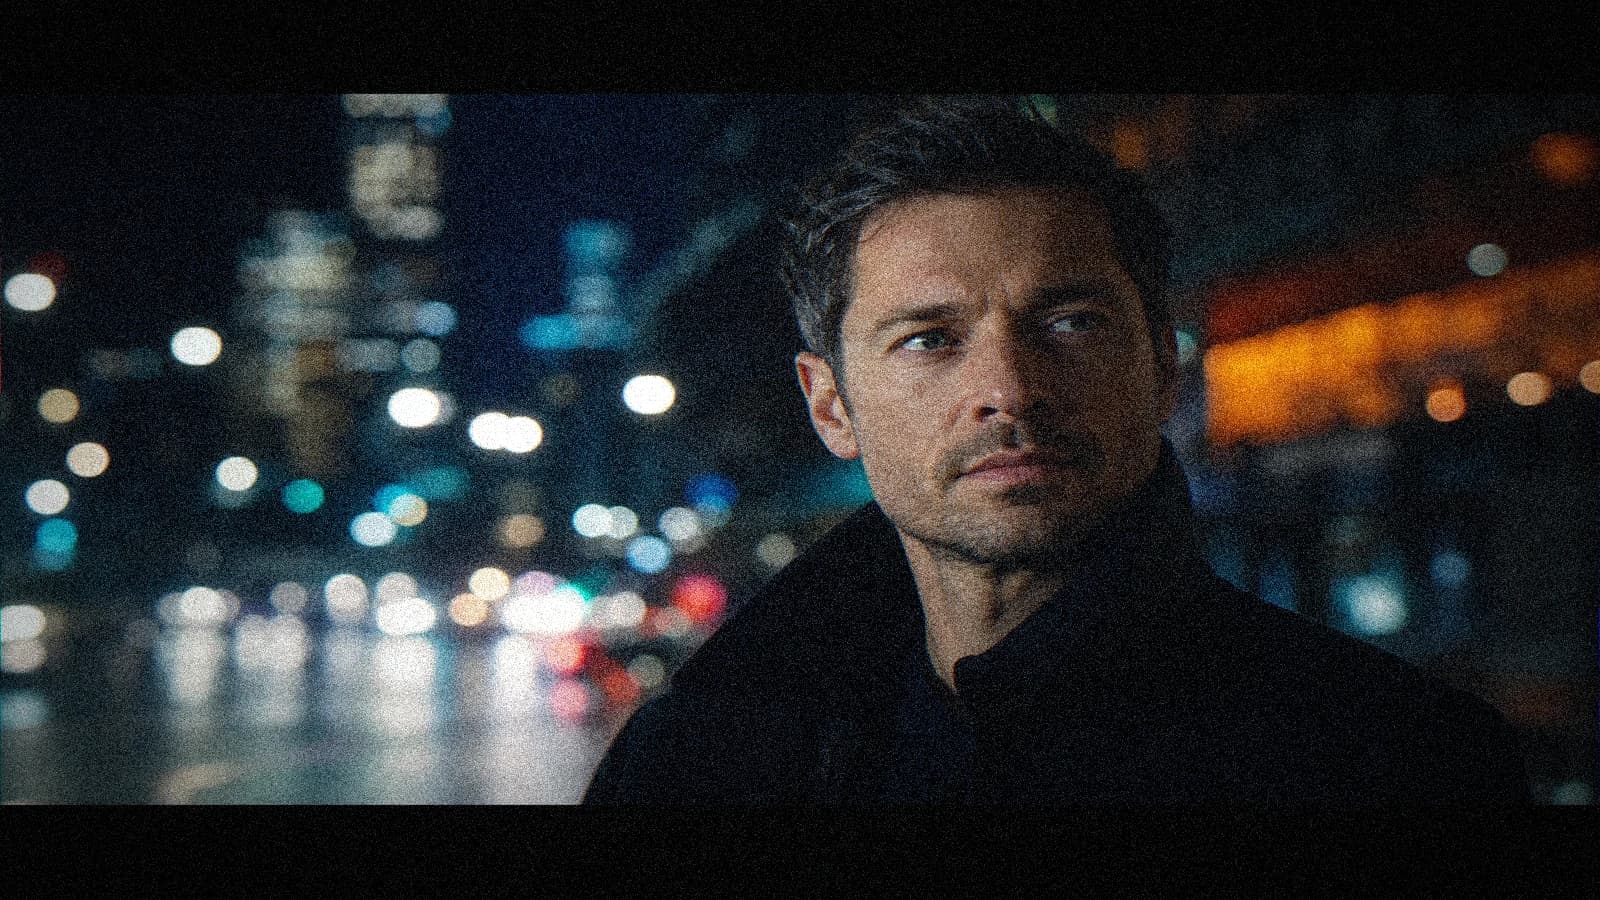
The neon night is one of the most requested and most badly executed styles in AI video. We often see faces drowned in magenta, aggressive contrasts, blocked blacks and skin that looks like colored plastic. It is spectacular in thumbnail, catastrophic in continuous reading.
The problem is not the neon. The problem is the absence of light hierarchy. A successful night scene keeps a credible skin base, anchored on a mastered white balance, even in a colored environment. The neon accents serve the atmosphere, they must not destroy the humanity of the subject.
This guide shows you how to hold this balance in a reproducible way, from the preparation to the final grade.
Why everything goes magenta in AI
Three main causes:
-
Uncontrolled global saturation
The engine over-interprets "neon cinematic" by pushing purples and pinks everywhere. -
Badly defined light source
With no dominant source, the colors superimpose and crush the flesh tones. -
Aggressive post-production
Too-strong LUT + hard contrast = dead skin.
The correction starts at the brief, not at the end of the timeline.
Fundamental principle: a neutral base, colored accents
Even in a neon night, keep:
- a readable skin base;
- a stable main source;
- secondary colored accents.
Think in layers:
- layer 1: exposure and volume of the face;
- layer 2: ambient color;
- layer 3: neon accents.
If you invert these layers, you lose the material of the subject.
Preparing a clean neon scene
Before generating:
- choose two colors max;
- define the dominant source;
- indicate the subject-light distance;
- lock the contrast level.
Effective palette:
- cyan + amber;
- purple + soft green;
- electric blue + warm tungsten.
Risky palette:
- three saturated neons of equal strength;
- pure red + pure magenta + pure blue with no hierarchy.
Useful prompting for credible skin
Avoid too-vague decorative prompts.
Prefer:
night street portrait, one dominant side key, subtle neon accents,
natural skin texture, controlled saturation, cinematic low light, no magenta cast
The keyword is controlled saturation, not ultra neon.
Recommended framing and movements
Robust framings
- 3/4 chest shot;
- tight shot with low parallax;
- short lateral move.
Fragile framings
- very close frontals with multiple sources;
- long orbits around the subject;
- very wide shots with signs over the whole frame.
The neons become credible when you frame the subject, not the whole storefront.
Production workflow in 5 blocks
Block 1: fixed pilot
Validate an image where:
- realistic skin;
- readable shadows;
- neon present but not dominant.
Block 2: short animation
Launch 4 variants of 3-4 seconds.
Block 3: sorting
Remove any shot with:
- magenta drift;
- glassy eyes;
- inconsistent shadow.
Block 4: local correction
Work the skin separately from the background:
- lower the saturation of reds/magentas;
- raise the skin luminance;
- protect the details.
Block 5: scene harmonization
Align all the shots of the sequence, not only the best shot.
QA table for skin under neon
| Criterion | Question | Tolerance |
|---|---|---|
| Tone | Does the tone stay human? | Mandatory yes |
| Shadows | Do the shadows tell a real source? | Yes |
| Saturation | Do the magenta tones dominate everything? | No |
| Eyes | Plausible reflections? | Yes |
| Continuity | Same skin on the next shot? | Yes |
| Mobile | Readable on a small screen? | Yes |
Practical case 1: night fashion clip
Goal: premium urban aesthetic.
Initial failure:
- uniform magenta;
- too-bright background;
- waxy skin.
Correction:
- a single side key;
- 20% global saturation reduction;
- face/background separation in grade.
Result: neon atmosphere kept, subject finally human.
Practical case 2: outdoor night interview
Goal: stylized documentary credibility.
Winning choices:
- light fixed shot;
- defocused neon background;
- clear and close voice;
- sober color.
The neon becomes a narrative setting, not the main effect.
Practical case 3: tech ad in a wet alley
Goal: tension and modernity.
Pipeline:
- controlled floor reflections;
- cyan accents on the contours;
- skin kept warm;
- discreet urban sound.
The skin warmth against the cold setting creates the depth.
Grading: anti-magenta method
Recommended order:
- white balance;
- primary contrast;
- selective magenta correction;
- flesh-tone protection;
- fine grain.
Do not put a "neon" LUT first. You first treat the skin.
Night sound design
The sound stabilizes the perception:
- distant street atmosphere;
- ventilation;
- footsteps;
- diffuse traffic.
A silent neon image looks like a mockup.
Managing the client limits
When a client asks for "more colorful":
- propose a balanced version A;
- propose a more saturated version B;
- compare with the skin QA grid.
The client often chooses the more human option in real viewing.
Final checklist
- credible skin on all the shots;
- no uniform magenta bath;
- clear light hierarchy;
- palette continuity;
- clean mobile grade;
- sound in place.
Foire aux questions
Réponses rapides aux questions les plus fréquentes sur cet article.
Why does my skin turn purple in one second?
Too-strong saturation and absence of a dominant source. Reduce the accents and protect the flesh tones.
Should you avoid magenta completely?
No. Magenta can be an accent. The problem is when it replaces the whole skin base.
What warm/cold color ratio to aim for?
A slightly warm base on the skin, with cold or colored accents in secondary.
How to keep the eyes natural under neon?
Limit the multiple reflections and keep a moderate contrast level around the eyelids.
Does 9:16 accentuate the problem?
Yes, because the subject takes more space. The skin defects become more visible.
Can you save a too-magenta scene in post?
Partially. If the skin material is already destroyed, you often have to regenerate.
The successful neon night does not try to paint the whole frame in color. It keeps a living face in a luminous world.
Advanced workshop: rain, neons and wet surfaces
Wet surfaces amplify the colors and can quickly turn the scene into uncontrolled saturation. The key is to limit the visible active sources:
- one main dominant;
- a weak secondary;
- ambient reflections with no excessive peaks.
On a wet road, protect the highlights from the generation if possible, then in post with a soft rolloff. Otherwise, the social compression is going to create flickering flat areas.
Skin/background segmentation in post
On neon shots, work in two logics:
- skin: stability, softness, flesh tones;
- background: style, contrast, accents.
If you grade everything together, the background wins and the skin loses. With segmentation, you keep the atmosphere without sacrificing the human.
Multi-shot pipeline for consistency
In a night sequence, the most visible inconsistency is the skin variation between shots. To avoid it:
- fix a master-shot reference;
- align the other shots on this master;
- validate on a calibrated screen then mobile;
- adjust only what drifts.
This workflow avoids the visual patchwork.
Complementary FAQ
How to avoid the "digital makeup skin" effect?
Reduce the local sharpness and keep a micro texture. A too-smooth skin under neon becomes immediately synthetic.
Should you add grain on all the shots?
A discreet grain can unify, yes. But it must not mask light or tint errors.
What is the number-one rejection signal?
A face that changes tint on each head movement. It is the most obvious fake marker.
How to convince a client who is a fan of extreme colors?
Show a comparison on mobile. The balanced version keeps the impact while staying credible.
Light design: 1 source, 2 sources, 3 sources config
To avoid the magenta bath, think in reproducible schemes.
1-source scheme
One colored main source, the rest neutral.
When to use it:
- intimate portrait;
- tight shots;
- minimalist narration.
Advantage: maximum control of the skin.
Limit: less atmosphere richness.
2-source scheme
One dominant key + a secondary accentuation.
When to use it:
- urban clip;
- walking scene;
- shots with depth.
Advantage: volume and atmosphere.
Limit: requires fine tuning of the saturations.
3-source scheme
Key + fill + colored rim.
When to use it:
- advanced stylized scene;
- dense environment;
- project with a solid post.
Advantage: rich render.
Limit: very easy to lose the skin.
If you are a beginner, stay in scheme 1 or 2.
Color architecture to hold a whole sequence
The frequent mistake is to validate a magnificent shot that matches nothing.
Create a simple architecture:
- dominant scene color;
- accent color;
- target skin color;
- saturation ceiling level.
You can formalize it in a mini chart:
| Element | Target value |
|---|---|
| Background dominant | moderate blue-purple |
| Signage accent | light cyan |
| Skin | warm neutral |
| Max saturation | moderate |
With this frame, you can iterate fast without getting lost.
Traps of signs and LED panels
Real LED panels have light behaviors hard to reproduce:
- flicker;
- clipping on the highs;
- out-of-gamut colors.
In AI, it can create aggressive zones.
Solutions:
- slightly blur the panels in depth;
- avoid readable text in the foreground;
- reduce the local intensity of the LEDs;
- keep the subject at a distance from the extreme sources.
The neon must support the shot, not destroy it.
Skin tone: practical method in 4 corrections
-
Base neutralization
Bring the skin back into a natural range. -
Magenta/red separation
Avoid the magenta contaminating the skin reds. -
Skin luminance
Maintain the reading of the face volumes. -
Micro texture
Do not smooth in excess.
Do these corrections before any heavy stylization.
Movement and color: direct link
The stronger the camera movement, the more the color drifts become visible. Why:
- fast reflection variations;
- background changes;
- more severe compression.
So:
- short movements;
- moderate speeds;
- well-segmented shots.
The edit creates the final dynamism.
Shot-breakdown strategy for a 30-second neon scene
Typical breakdown:
- establishing 3 s;
- subject shot 4 s;
- detail insert 2 s;
- move 4 s;
- reaction 3 s;
- exit 3 s.
Raw total around 19 seconds, completed by breathing and sound transitions.
This breakdown reduces the pressure on each individual shot.
Night sound: calibrating with no cyberpunk cliché
You can easily fall into the "drone + rain + bass" stereotype.
A more credible approach:
- realistic urban base;
- discreet punctuations;
- silent breathing;
- music in the background.
The sound must let the faces exist.
Client workflow: editorial version and social version
Prepare two grades:
- edition master: more nuanced, dynamic;
- social: a bit more readable, more robust to compression.
Do not forget to check the skin on both versions. Many shots are correct in master but turn magenta in the compressed version.
Multi-condition QA
Test:
- calibrated screen;
- standard laptop;
- bright smartphone;
- smartphone in low brightness.
If the tone holds in these four conditions, you have a real robustness.
Managing the blacks in a neon night
Too-crushed blacks = floating face.
Too-open blacks = flat shot.
You want living blacks:
- minimal detail kept;
- local contrast on the subject;
- deeper background but not blocked.
The depth comes from the balance, not from the violence of the contrast.
Advanced case: dark skin under neon
It is an important and often badly treated case.
Rules:
- protect the specular highlights;
- avoid magenta overload;
- keep details in the low zones;
- favor a soft directional key.
The goal is to keep texture richness and natural volume.
Advanced case: strong makeup and neon
Makeup + neon can drift fast.
Approach:
- separate skin/makeup treatment;
- limit the local saturation;
- check the continuity shot to shot.
The makeup must stay consistent, not fluctuating according to the frames.
Internal preset library
Create three homemade presets:
- soft neon preset;
- urban neon preset;
- dramatic neon preset.
Each preset documents:
- target saturation;
- skin protection;
- highlights rolloff;
- grain.
You save time and consistency.
Actionable client feedback method
Forbid the vague feedback of the "less fake" type.
Ask for structured feedback:
- skin too pink / too purple / correct;
- atmosphere too dark / too bright / correct;
- subject readability weak / correct / strong.
This format speeds up the iterations.
Complementary FAQ 2
How to handle too-colored lips under neon?
Lower the local saturation of the reds and adjust the luminance to keep the shape with no paint effect.
Do glasses worsen the color drift?
Yes, because they add colored specular reflections. Frame slightly from the side and limit the direct sources.
Should you simulate neon flicker?
Very slightly if narrative. A too-visible flicker destroys the perception of quality.
Which mistake loses the skin the fastest?
Applying a stylized LUT before balancing the flesh tones.
How to succeed at a group scene under neon?
Reduce the light complexity and keep a dominant axis. More faces = more drift risks.
Can you keep a strong look with no fake?
Yes, if the skin stays stable. The style starts after the credibility, not before.
Final workshop: fast review protocol before export
Before delivery, do this 12-minute sprint:
- reading with no sound;
- reading with sound;
- pause on three key frames;
- skin tint check;
- high signage check;
- social test export;
- mobile re-read.
If a point breaks, correct locally and retest.
This protocol avoids the bad surprises after publication.
A successful neon shot stays human at first glance, stylish at second glance, and solid at the third viewing.
Finishing notes for difficult skins
When you are close to the final version, avoid the big corrections. Work micro:
- correct locally the dominants on forehead, nose, cheekbones;
- watch the neck/cheek transition, often the first zone to drift;
- check the lips and the ears, which saturate fast under neon;
- keep a fine texture, with no excessive beauty effect.
A too-"clean" render removes the human presence.
Final validation in a real context
Watch the sequence in two contexts:
- basic headphones or earbuds, smartphone in hand;
- a wider screen in a dark room.
If the skin holds in these two conditions, your scene is ready. Otherwise, go back to the base balance rather than adding a stronger LUT. The goal is not to impress on pause, but to convince in reading.
Express anti-magenta check
You can finish each neon scene with this routine:
- check forehead, nose, cheekbones;
- check ears and neck;
- compare two consecutive shots;
- control the saturation of the background;
- export a compressed preview.
If a single point slips, correct selectively then revalidate. This method is simple, but it is what avoids 80% of the feedback of the "it is beautiful but it still looks AI" type. The credibility is born from these repeated micro decisions.
Also think about checking the transitions between shots, not only the isolated shots. A skin perfect shot by shot can become unstable at the cut if the temperature changes brutally. A light harmonization of the linking tints is often enough to make the whole sequence more professional.
Keep this simple rule: the style can vary, the skin must stay reliable. It is the condition for a neon look to seem intentional rather than "accidentally AI".
Finally, think about keeping a reference capture of the validated shot with scopes or main settings. On multi-episode projects, this reference avoids the gradual drift toward a too-purple or too-saturated render, and guarantees a quality consistency over time.
If you have to delegate part of the edit, also share this reference with the team. With no common visual alignment, the color drifts come back fast, even with good technicians.
Last reminder: the consistency comes before the excess. A slightly less intense neon but a stable skin almost always gives a more premium render than an over-saturated scene.
Over time, this philosophy protects your visual identity and avoids the dated renders.
If you hold this editorial line, your night scenes stay visually strong without falling into the colored caricature.
Related articles
 Tutoriels
Treating Skin and Faces in AI Video Post Without the Plastic Look
A delicate post workflow to fix AI faces without falling into a smooth, artificial render.
 Tutoriels
How to Improve Skin Texture in an AI Image
Side light, frequencies, local retouching and export for video or print.
 Tutoriels
Generating a Realistic Crowd With No Clones or Identical Faces
Breakdown, depth, costume variation and post for credible crowd shots in fiction and advertising.