AI Film: Continuity Errors (Visual Inconsistencies) and How to Avoid Them
A field method to eliminate the continuity errors in an AI film and keep a cinematic visual continuity end to end.
AI Film: the Continuity Errors That Ruin Credibility and How to Eliminate Them
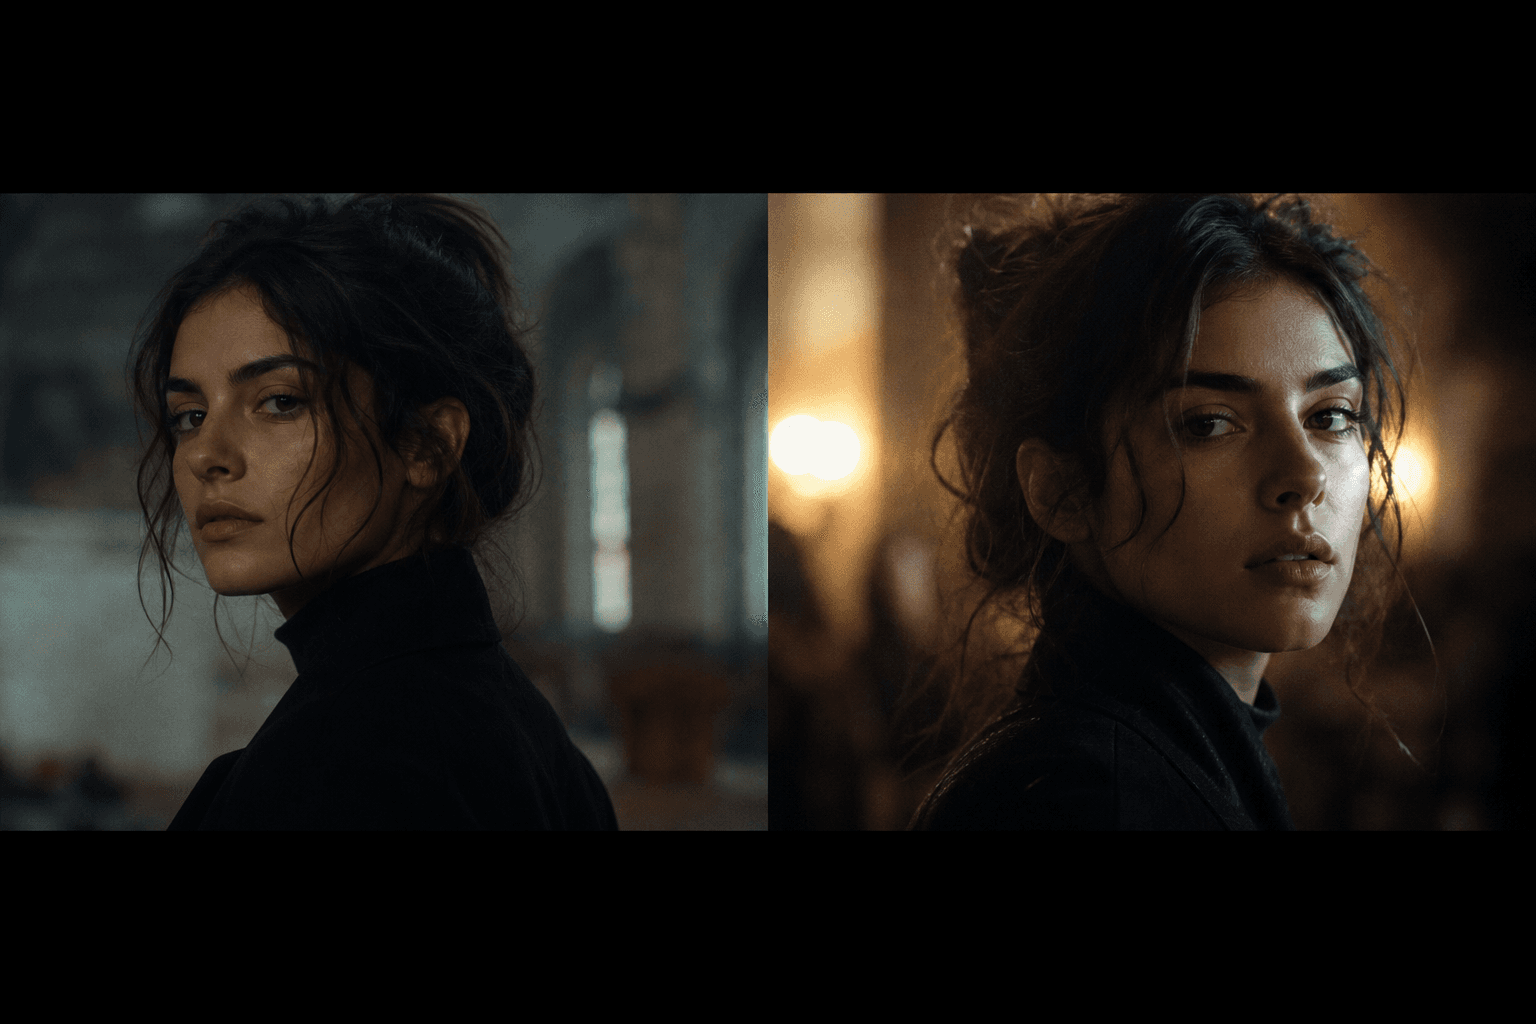
You spent hours generating great shots. Individually, they are strong. In the edit, it breaks. The jacket changes texture, the light pivots for no reason, the cup jumps from one hand to the other, and your character seems to age between two cuts. It is exactly how an AI film loses its credibility, even with beautiful images.
I am going to be brutal because it is useful. Continuity errors are the first reason an "AI" render is perceived as fake. The viewer does not know your prompt, your model, nor your workflow. They see only one thing: does this world hold up from one shot to the next? And this question often decides the perceived value of your project.
Good news, you can fix this with a clear method. Not with incantations. Not with ten magic plugins. In this article, I show you how to lock the continuity before generation, control your shots during production, correct intelligently at the edit, then deliver a visually stable version across the whole timeline. And above all keep your staging identity.
Core concepts: visual continuity in an AI film
A match is not only "the same shirt in two shots". It is a system of perceptive consistency. The viewer's brain reconstructs a space, a time, and an intention from thousands of micro-signals. If these signals contradict each other, they drop off. Even if your image is beautiful.
The first axis is the character. Face, haircut, silhouette, accessories, body energy. In AI, these are elements very sensitive to the variation of prompt and seed. With no strict sheet, you get a "same character" who changes subtly at each shot. And these subtleties destroy the trust.
The second axis is the light. A key on the right then on the left with no narrative justification, a temperature that goes from tungsten to daylight in one cut, shadows that no longer have the same geometry, and your space no longer exists. The light tells the architecture of the world. If it lies, your world collapses.
The third axis is the camera. Focal length, height, distance, angle, movement. Many inconsistencies come from an edit that jumps between incompatible camera choices. It is not a "nervous style". It is a contradictory language. To lay a solid base, our guide on AI camera angles is an excellent starting point.
Fourth axis, the set and the objects. Props, materials, density, wear state, weather. An object that appears then disappears with no logic immediately draws the attention. This type of error looks like nothing in a still shot, but in a sequence it is catastrophic.
Fifth axis, temporality. You must know whether the cuts represent seconds, minutes, hours. With no this logic, your film seems "glitched". A wet jacket in shot A then dry in shot B can be coherent if time has passed. It is absurd if the action is continuous.
A point often forgotten: emotional continuity. Even if the image "matches", a character who goes from a very calm state to an extreme panic with no clear progression creates a perceptive break similar to a false visual match. In AI, this inconsistency appears when you generate the shots without keeping an acting trajectory. So you must note the emotional state of each shot in your continuity sheet, exactly as you note the light or the accessories. This discipline reinforces the global credibility and also helps the sound edit enormously.
| Type of match break | Visible symptom | Frequent cause | Narrative impact | Priority correction |
|---|---|---|---|---|
| Unstable character | face/outfit that vary | prompt too broad, uncontrolled seed | loss of identification | character bible + reference lock |
| Inconsistent light | shadows/tints that jump | absence of a light rule | non-credible space | key/fill/temperature charter |
| Contradictory camera | incompatible focal lengths/angles | shot-by-shot generation with no grammar | "broken" edit | technical breakdown plan |
| Discontinuous set | objects change place | lack of prop tracking | permanent distraction | props checklist per shot |
| Fuzzy temporality | inconsistent time traces | badly defined timeline | story incomprehension | temporal continuity sheet |
The trench workflow: a field protocol to avoid visual inconsistencies
Your first mission, even before the first prompt, is to create a continuity bible. One page is enough to start. You lay there the character identity, the light rules, the critical props, the camera grammar, and the temporal logic. This bible becomes your visual contract.
Then, you build your shots by sequences, not as a collection of isolated images. Each shot must answer what precedes it and prepare what follows. In AI, this logic is vital because the model does not naturally "know" your sequence. It is you who must inject the continuity.
I recommend a simple 3-pass validation system: character pass, light/color pass, set/camera pass. You look at the complete timeline and you note only what breaks the perception. No aesthetic adjustments at this stage. You hunt the structural breaks.
Finally, you first treat what destroys the story, then what improves the beauty. It is counter-intuitive for beginner creatives, but it is the hierarchy that works. A coherent film that is a bit rough is stronger than a "perfect" but incoherent film.
Step 1: lock the character continuity before massive generation
Start with an operational character sheet. Visual age, morphology, haircut, skin texture, fixed accessories, dominant posture, fatigue level, emotional tone. You may think it is "too much", but in AI this level of precision avoids 80 percent of the drifts.
Then create a pack of internal references. Three to five validated reference images, in different angles and lights. This pack serves as a guardrail when you generate new shots. With no it, you will "drift" visually and have to correct by hand shot by shot.
Generate a mini sequence test, not a gallery. Three shots are enough: entrance, medium, exit. If the continuity holds here, you can extend. If it breaks, you correct now. This step saves you hours of post-production.
If needed, work in shot families with dedicated settings. For example "interior night face", "exterior day movement", "object insert". A single preset for the whole film almost always gives parasitic variations.
Step 2: stabilize light and set with non-negotiable rules
The light is your spatial skeleton. You must define a light sentence per scene. Example: "soft key window left, weak fill, background one notch colder". This sentence serves you as a compass at each generation. If a shot violates it with no narrative intention, it leaves the sequence.
For the set, make a high-narrative-value props checklist. The objects that tell the story must not move at random. Show the model where they are, in what state, and at what distance from the subject. This rigor radically changes the quality perception.
Do not forget the materials. Dry wood, brushed metal, worn leather, dirty glass. These textures must stay consistent from one shot to the next. A material that changes nature between two cuts is immediately perceived as an error, even by a non-technical audience.
Finally, think weather and atmosphere. A wet scene must stay wet visually. A cold scene must keep its color logic. If you alternate with no justification, your story loses its emotional spine.

💡 Frank's Cut: when a sequence resists, simplify. Fewer variables give more stability. A simple and coherent scene almost always wins against an ambitious but unstable scene.
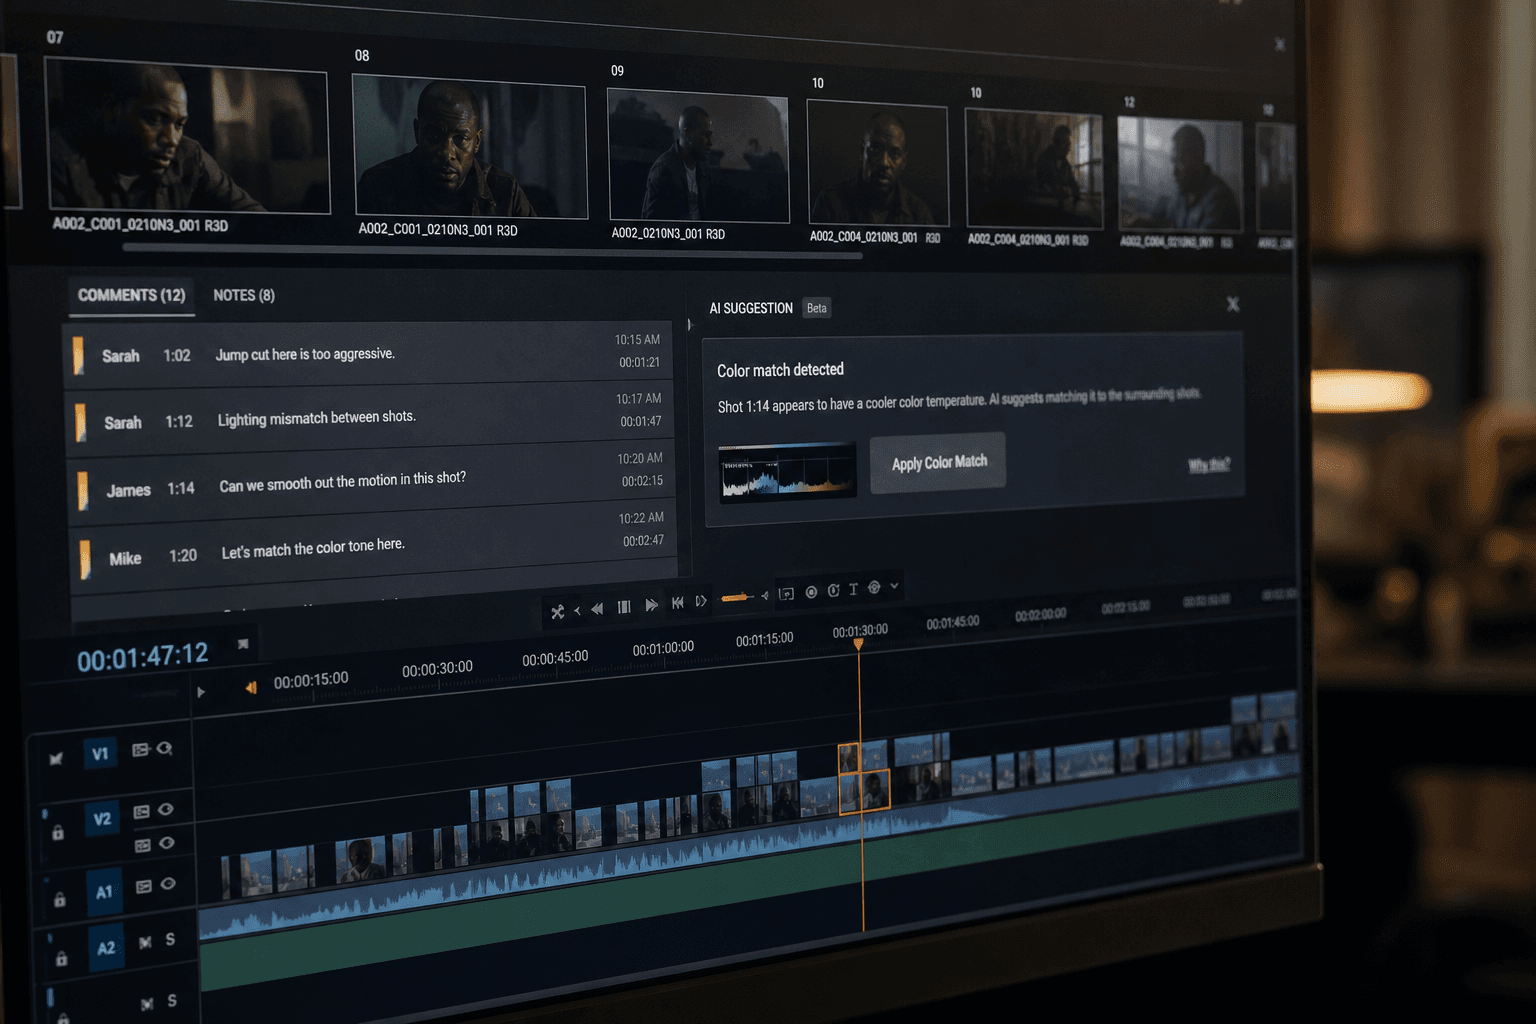
Step 3: control at the edit with a concrete match grid
At the edit, do not do a "general feeling" viewing. Do a targeted technical review. Check the gaze direction, the dominant hand, the shadow orientation, the position of the key objects, the contrast level, and the skin consistency. Tick or correct, with no improvisation.
Work in short loops of 20 to 40 seconds. The breaks are seen better on a continuous range than on a whole film at once. When you find an inconsistency, trace it back to its origin. Is it a generation problem? a prompt one? a shot choice one? a color one? This analysis lets you correct cleanly.
Avoid correcting each flaw with heavy compositing if the source is bad. Sometimes, regenerating a shot with stricter constraints is cleaner than cobbling together ten masks. It is a production decision, not an ego one.
To make your control reliable, create a "witness shot" of the sequence. It is your visual truth reference. All the other shots must dialogue with it. If one diverges too much, you immediately know where to act.
Step 4: coherent finish without masking the structural errors
The finish can harmonize a film. It cannot save a broken continuity. The grading unifies the tints, the contrast, the density. The grain homogenizes the textures. But if a character changes face from one cut to the next, no LUT can repair that.
Apply your finish treatments after validating the structural match. Otherwise you waste time polishing shots that will be regenerated. It is a very frequent pipeline mistake among rushed beginners.
Test your sequence on different screens. The contrast and skin inconsistencies often explode on a mobile or a non-calibrated laptop. This test protects you against bad surprises in real distribution.
If you work the final render aspect, our guide on cinema grain in an AI image helps you keep an organic material without falling into artificial over-texture.
Troubleshooting: what beginners break the most and the exact fixes
Classic mistake number one, generating the shots in disorder with no clear timeline. You get seductive but incompatible images. Correction: establish a sequence breakdown before production and generate in the narrative order. You thus maintain a usable continuity logic.
Mistake number two, changing the major prompt at each attempt. The style goes in all directions. Correction: lock a stable prompt core, then modify one variable at a time. It is the only way to understand what creates the drift.
Mistake number three, neglecting the accessories and the hands. Hands that change or objects that teleport instantly destroy the credibility. Correction: prioritize these zones in your quality control and impose a mandatory props checklist on each sensitive cut.
Mistake number four, compensating for the match breaks with a too-fast edit. Yes, it can mask temporarily. No, it does not solve the problem. Correction: take back the source, regenerate the critical shots, then re-edit with a rhythm that serves the story instead of camouflaging flaws.
Mistake number five, forgetting the sound consistency with the visual match. A correct image continuity can still seem false if the audio ambience jumps brutally. To reinforce this aspect, our AI voice-over and dubbing guide is useful to integrate the sound into the scene logic.
If you want to lean on solid bases, look at the notions of continuity editing, the principles of the 180-degree rule and the foundations of shot/reverse shot. These references stay relevant even in a modern AI pipeline.
💡 Frank's Cut: when you hesitate between two versions, choose the one that better tells the space and the time, not the one that "pops" the most as a still image.
FAQ: the key questions to avoid visual inconsistencies in an AI film
-
Why does my AI film seem fake when each shot is beautiful?
Because a film is not a series of images successful in isolation. It is a perceived continuity of space, time, light, and character. If these elements change with no logic, the viewer drops off. In AI, this problem arrives fast because each generation can drift subtly. The solution consists of moving from a "shot gallery" logic to a "controlled sequence" logic. You must validate the consistency between adjacent shots, not only the visual quality of each shot. It is this method transition that transforms an impressive result into a credible film. -
What info to put in a continuity bible to start?
Stay simple but precise. Describe the main character, their fixed accessories, the light sentence of the scene, the critical objects of the set, the dominant camera rule, and the temporality of the passage. Add 3 to 5 validated reference images. This bible does not need to be heavy to be effective. It must above all be actionable during the generation and the edit. When a new image arrives, you must be able to say quickly whether it respects the rules or not. With no this frame, you compensate in post-production, which costs more time and gives a less stable result. -
How to quickly check the matches without analyzing the whole film for hours?
Use short loops of 20 to 40 seconds and a fixed control grid. Systematically check character, light, camera, set, temporality, then ambience audio. Do not judge by the global feeling on the first pass. Tick concrete points. This method makes the review faster and much more reliable. You can then do an artistic pass once the structural breaks are corrected. Many beginners reverse the order, waste time on aesthetic details, then discover too late a major inconsistency that forces them to redo the complete sequence. -
Should you generate the whole film at once or sequence by sequence?
Sequence by sequence, almost always. Generating everything at once can seem faster, but the risk of massive drift is enormous. By working by sequences, you progressively validate the continuity and you limit the retakes. This approach also lets you finely adjust the visual constraints per scene without breaking the global identity of the film. In a pro pipeline, smart segmentation actually accelerates the final delivery, because it reduces the heavy corrections at the edit. It is less spectacular at the start of the process, but much more profitable at the end of the project. -
Which matches are the most sensitive for the viewer?
The faces, the hands, the gaze direction, the shadow logic, and the narrative objects close to the character. The audience instinctively spots these zones because they carry the action and the emotion. A texture variation on a wall sometimes goes unnoticed, but a ring that changes hand or an inverted shadow jumps out. So concentrate your efforts on these priorities before treating the secondary details. This control hierarchy is essential when you work under time constraint. It strongly increases the perceived credibility without blowing up your schedule. -
Can you correct match errors only in grading?
The grading can homogenize part of the contrast and color gaps, but it does not correct the structural breaks. If the posture, the face, the lighting logic or the position of an object are inconsistent, you must intervene earlier in the chain, often in a targeted regeneration or a shot replacement. Consider the finish as a final cohesion layer, not as a total rescue tool. This distinction saves you time and avoids weeks of micro-corrections that never reach a really professional level. -
How to keep the same visual identity on a long AI project?
Work with stable references, a core of constant prompts, and a regular control routine every few minutes of timeline. Do not let the settings drift through fatigue or haste. Document what works and what breaks. On a long project, this documentation becomes your consistency engine. You can also lock "witness shots" for each scene universe and compare each new render to these landmarks. This discipline reduces the variability and protects your film against the patchwork effect very frequent in ambitious AI productions. -
What simple routine to apply this week to reduce my match errors?
Do a 90-minute sprint oriented toward continuity. 20 minutes to create a minimal bible, 30 minutes to generate a mini sequence of 3 to 5 shots, 20 minutes of technical review with a control grid, then 20 minutes of targeted corrections. The goal is not to produce a final film in one session. The goal is to train your eye and your pipeline to maintain the consistency. Repeat this exercise on two different scenes. In a few iterations, you will feel a clear improvement in the global credibility of your projects.