How to Create a Dark, Cinematic Mood with AI
Real black, practicals, faces in shadow, grain and export with no mud or cheap HDR.
You are here for: How to create a dark, cinematic mood with AI. Good. We are going to avoid two traps right away.
The first trap is believing that a single magic setting fixes everything. The second is accumulating tutorials without ever finishing a mini project. Choose a short duration, eight to fifteen seconds or a single image, and go all the way with a method.
What I propose here is a field reading. Not a promise. You are going to understand why some images "pass" and others instantly trigger the "AI" reflex in the viewer. Often it is not the resolution. It is the lying light, the skin too smooth, the inconsistent bokeh, or a movement that defies physics.
Three mini scenarios. A creator wants beautiful with no constraint: he gets generic. Another wants detail everywhere: he gets plastic. A third wants cinema with no sound: he gets a showroom.
For How to create a dark, cinematic mood with AI, keep a simple rule. One strong decision is worth three compromises. One clear light source is worth ten adjectives. One export with a clean file history is worth a night of chaos.
Let us go down into the concrete. Note with a pen what you did before, apply a single modification today, compare tomorrow. If you do not see the difference, it is fine, you will at least have one more criterion. The eye trains like a muscle, with honest repetitions.
Key concepts (what you must remember before clicking everywhere)
The "porcelain" skin render often comes from a too-high mix of detail plus a hard frontal light. Tilt the light, add a soft shadow under the nose, lower the clarity on the high frequencies of the skin in post. Skin has pores, not a grid.
The vertical format imposes a different reading. A horizontal wide shot tells the environment. A vertical demands a clear subject, a strong line, few parasitic elements on the edges. If you reframe a horizontal into a vertical without rethinking the composition, you get cut-off heads and hands that enter by surprise.
The reflections in the eyes tell the room. A rectangular catchlight on a "candle only" scene lies. Harmonize the shape of the source with the set. The small consistency details silence the critical brain.
Image upsampling is not always your friend. More steps can crystallize skin textures into stucco. Look for the level where the pores become suggested again rather than drawn. It is often a little before the maximum the interface proudly offers you.
The background noise of a night scene is never silent. Even "silence" has a hiss. Add a low room tone, then cut in the edit where you want the real void. The contrast between almost nothing and nothing makes the tension.
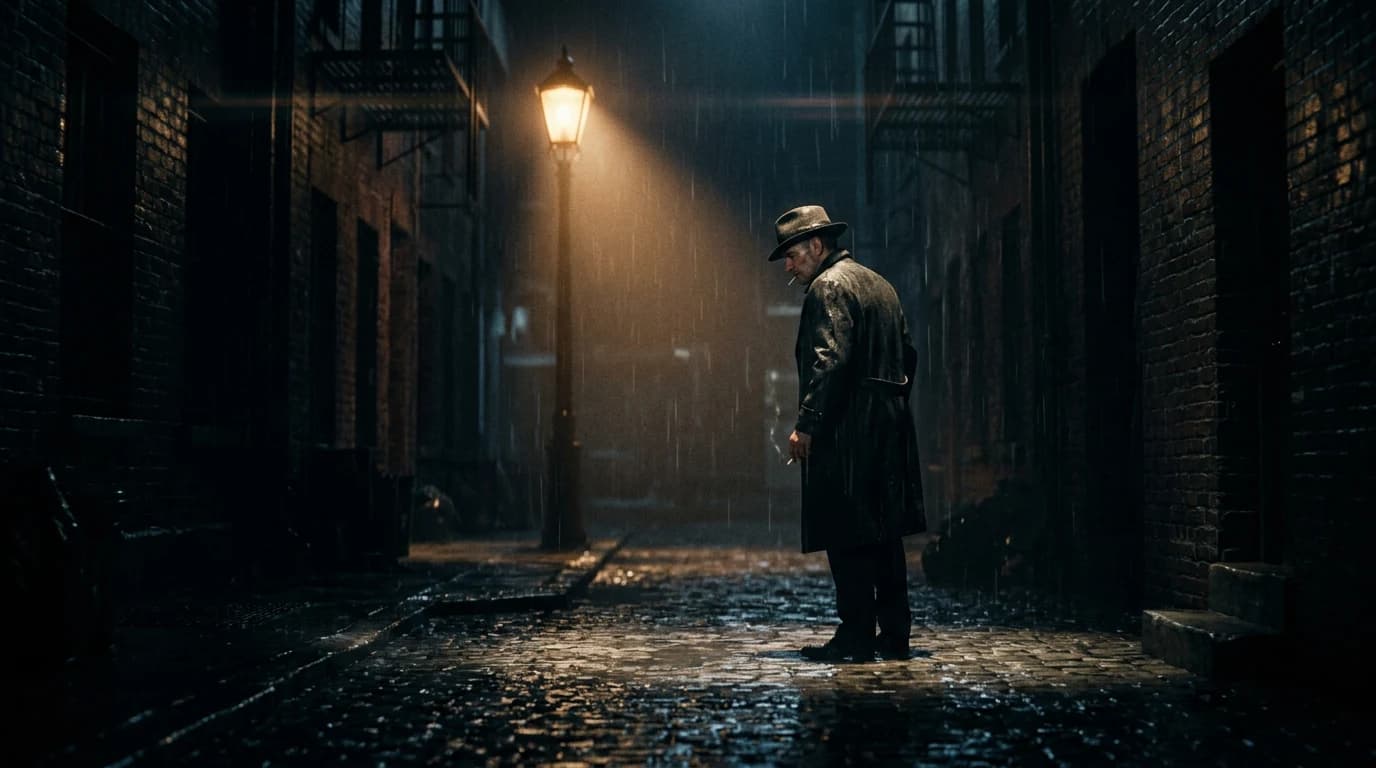
Film references must be lighting references, not subject references. Saying "like Blade Runner" without specifying interior, rain, indirect neon means nothing to a model. Say instead: rain, reflections on the ground, neon in the background, face lit by a soft close source.
Set notes, details that change everything
The AI sequence shot is appealing and rarely clean. If you want one, isolate a simple set, a clear action, a slow movement. Otherwise cut into three shots, the viewer will prefer three truths to one lying sequence.
"Cinema" AI transitions are often demo transitions. Real cinema cuts. If you use an AI dissolve between two different images, you mix two geometries. Prefer a hard cut with a sound that chains them. The ear makes the continuity, not the dissolve.
Shadows under the eyes that are too clean give 3D makeup. Add a micro color variation, a bit of red under the blue, a less sharp transition. Humans have layers, not flat layers.
Prompts that list twenty aesthetic adjectives with no geometry produce wallpapers. Replace half the adjectives with physical data: distance, focal length, camera height, time of day, dominant material.
The "porcelain" skin render often comes from a too-high mix of detail plus a hard frontal light. Tilt the light, add a soft shadow under the nose, lower the clarity on the high frequencies of the skin in post. Skin has pores, not a grid.
Eyes that are too bright and too blue are a classic AI signal. Lower the saturation on the whites of the eyes, add a micro shadow under the eyelid, avoid the perfect double-symmetric catchlight. The human eye is slightly imperfect, exploit that.
Dialogue sequences in AI need reaction shots. Even if you have no real actor, think cut, reverse cut, silence. The edit carries the dialogue, not a single shot that talks for thirty seconds.
Practical workflow, like on a real shoot (but with AI)
Step 1: choose the right engine for the task
Flux often shines on soft transitions, material, complex scenes with many objects. SDXL stays a Swiss army knife with an enormous ecosystem of LoRA and ComfyUI workflows.
Simple rule: if you want a skin-and-eyes portrait with fine control, test both on the same short prompt. Keep the one that lies the least on the hands and the teeth.
Step 2: resolution and reframing before beauty
Work in 16:9 or 2:3 depending on the output, not in square if your film is horizontal. Raise the resolution only when the composition is frozen. Otherwise you optimize errors in high definition.
Step 3: steps, CFG, scheduler, with no religion
Raise the steps to the point where the texture appears, then stop before over-definition. CFG too high = plastic. CFG too low = mud. Look for a window, note it, reuse it.
Step 4: skin in two steps
Step 1: generation with plausible light and a shadow under the nose. Step 2: light local retouching or inpainting on the eyes-mouth zone if necessary. Avoid regenerating the whole scene for a micro zone.
Step 5: cinema grain in post often better than in the prompt alone
A controlled grain overlay, adapted to the density of the shadows, reacts better than "add grain" thrown into the prompt with no measure. Combine the two only if you know what each layer brings.
Step 6: contrast and color
Curve first, saturation next. Isolate the skin if you push a teal-orange look. Keep blood in the reds of the cheeks, otherwise you go into 3D mannequin.
Step 7: credible depth of field
Describe the distance and the focal length. Check the sharp-to-blur transitions: too abrupt = collage. A slight Gaussian blur on the background in post can save an almost-good scene.
Step 8: export for what follows in video
Export a clean PNG or TIFF for the pilot image, keep a variant with grain if you chain directly to a video tool. Document the focal length and the light in a text file next to it, the video will thank you.
Micro settings before freezing a sequence
Eyes that are too bright and too blue are a classic AI signal. Lower the saturation on the whites of the eyes, add a micro shadow under the eyelid, avoid the perfect double-symmetric catchlight. The human eye is slightly imperfect, exploit that.
The background noise of a night scene is never silent. Even "silence" has a hiss. Add a low room tone, then cut in the edit where you want the real void. The contrast between almost nothing and nothing makes the tension.
Prompts that list twenty aesthetic adjectives with no geometry produce wallpapers. Replace half the adjectives with physical data: distance, focal length, camera height, time of day, dominant material.
Hard light is not a mistake in itself. The mistake is hard light with no direction. Say where the source comes from, its size, its color. North window, green neon as a backlight, tungsten desk lamp. Even if the model simplifies, your viewer brain looks for a lighting hierarchy. With no hierarchy, you get that flat gray that screams AI.
When you talk about cinema to a model, think physical camera. A 35mm indoors is not the same thing as an 18mm in the same spot. The 35mm brings the face closer without distorting the shoulders. The 18mm stretches the hands toward the camera and turns a simple gesture into a geometric catastrophe. If your character has hands in the foreground, choose a longer focal length or pull the virtual camera back.
Character consistency is not copy-pasting the same prompt twenty times. It is a short sheet: approximate age, anchored clothing, mark of time, a discreet scar, a real haircut. Then a fixed reference image you re-inject. If you change a major detail between two shots, the human brain detects it before it even knows why.
Camera moves in AI reward modesty. A 5% push-in over ten seconds sells the emotion better than a full orbit that distorts the architecture. If you want dynamism, cut in the edit, do not force the physics in the generation. The edit lies to the camera, the viewer accepts it.
Shadows under the eyes that are too clean give 3D makeup. Add a micro color variation, a bit of red under the blue, a less sharp transition. Humans have layers, not flat layers.
The one-sentence brief never works. In three honest sentences, often yes. Sentence 1: who, where, what time. Sentence 2: what the viewer must feel at the end. Sentence 3: what is visually forbidden. The prohibitions save you from the default sci-fi neon pack.
Depth of field in the prompt: describe the lens and the distance. Anamorphic gives oval bokeh and a soft falloff. Spherical sharp at 50mm gives a rounder, more neutral bokeh. If you specify nothing, the model gives you a "generic" bokeh, often too sharp and too clean.
The fear of black pushes beginners to lift the shadows up to gray. Keep real black, especially in cinema. Black gives volume. Gray gives the demo.
The background noise of a night scene is never silent. Even "silence" has a hiss. Add a low room tone, then cut in the edit where you want the real void. The contrast between almost nothing and nothing makes the tension.
Quick decision table
| Choice | Criterion | Flux | SDXL |
|---|---|---|---|
| Portrait | skin and eyes | test in priority | huge LoRA, very flexible |
| Scene | multiple objects | often very strong | depends on the checkpoint |
| Local speed | VRAM | depending on quant | DIY optimized |
| Post grain | fine control | combine prompt + overlay | same |
| Video next | clean pilot image | PNG + meta export | PNG + meta export |
Cinema begins when you stop explaining and you show an intention. AI does not replace that, it accelerates the raw material.
Trench warfare: what beginners miss, and how to fix it
The AI sequence shot is appealing and rarely clean. If you want one, isolate a simple set, a clear action, a slow movement. Otherwise cut into three shots, the viewer will prefer three truths to one lying sequence.
Intermediate resolution is your lab. Work where you can iterate in ten minutes, not in three hours. When a sequence holds, upscaling or regenerating high makes sense. Otherwise you optimize a perfect pixel in a fake scene.
Cast shadows that are too black with no transition give a collage look. Add a very light fill or a credible indirect reflection. AI loves easy contrast. You have to bring back the ambient light that exists in a real room.
The background blur must follow a distance law. If the nose is sharp and the wall behind is blurred like cream while it is fifty centimeters away, the brain screams fake. Describe the camera-subject distance and the subject-background distance, even approximately.
The voice-over needs a spoken text, not a written text pasted in. Shorten the sentences. Add breaths. Read aloud before generating. If you run out of breath, so does the viewer. Mark the pauses with periods, not with commas everywhere.
The mental timecode matters. If your clip is a fifteen-second ad, every second has a function. Note what happens at 0, 3, 7, 12. Otherwise you go in circles on a shot that adds nothing to the structure.
Framings that are too centered give a poster, not a scene. Shift the subject, leave space in the direction of the gaze. The rule of thirds is not a law, it is a tool to avoid the default symmetric postcard.
Kitchen or bar moods with a thousand reflections call for cautious angles. If you simplify a row of bottles into a dark wall, you gain credibility. Reduce the complexity when the model shows limits.
Useful links in the AI Studio series
- Why your AI images lack contrast, and how to fix it
- How to create a cinematic video with AI, step by step
- How to turn an AI image into fluid, credible video
- How to improve motion realism in AI video
FAQ
Foire aux questions
Réponses rapides aux questions les plus fréquentes sur cet article.
Grain only in the prompt?
Often no, because the prompt alone gives you little control by zone. An overlay in post lets you precisely adjust the intensity in the shadows, on the skin and in the set. The most solid combo stays a light starting point in generation, then fine tuning at the grade.
I want a dark mood?
Always keep a readable light anchor (eye reflection, practical, window, indirect neon), otherwise the frame falls into gray mud. A successful dark mood does not mean "no light", but "hierarchized light". The viewer must understand where the main source comes from.
My blacks are gray?
Work the curve and the black point first, not the saturation. Gray blacks are often a sign of shadows lifted too much and badly structured contrast. Put real black back while keeping a bit of information around the subject to preserve the relief.
I am preparing an image for video?
Yes, treat it like a pilot image: clean export, note the focal length, the light direction and the color temperature. Keep a version with no aggressive sharpen to avoid freezing artifacts that will become visible in movement. The healthier your base still, the more credible the video stays.
I work locally, any VRAM advice?
Work at a modest resolution to iterate fast, then raise the definition only when the composition and the light are validated. On dark scenes, pushing the resolution too early accentuates the useless noise and slows the tests. The winning logic: fast iteration, clean final upscale.
Why is my skin plastic?
It is often a combination of guidance too high + frontal light + excessive global sharpness in post. Correct in this order: light and shadow direction, guidance/steps, then a very light local sharp if necessary. Credible skin is subtly textured, not "drawn" everywhere.
Low contrast, why?
Either the model is too conservative on the low lights, or your export/grade is too flat. First raise the global contrast and adjust the highlight roll-off, then only the saturation. If you saturate first, you quickly get an artificial look with no real depth.
Editorial compliance section

Useful internal links: