AI Grading: Mastering the Look and Color of Your Films
A complete pipeline to correct, harmonize and stylize an image with AI without breaking the skins or the continuity: scopes, shot groups, smart masks and reliable exports.

You just locked your edit. The rhythms hold. The sounds breathe. Then you open the color page and you feel tiny. You drop a LUT at random, you pull the contrast a bit, and suddenly your film looks like a phone ad. It is not a taste problem. It is a work-order problem. AI grading can save you hours, but only if you treat color as a chain: normalization, correction, continuity, then style.
The good news is that you do not need to be a Hollywood colorist to get a credible render. You must be rigid on the method and humble on the presets. This guide gives you the concepts that really change the image, a trench workflow, three real scenarios, a troubleshooting section, and a beginner-oriented FAQ for those who want to deliver cleanly.
Core concepts: what really changes the image quality
The first pillar is correct before stylizing. As long as your exposure and your global balance are not stable, any LUT or creative look will mask problems instead of solving them. You will see shadows that block up, highlights that crash, and skins that go magenta or green as soon as you push the contrast a bit. The color match AI is not magic on inconsistent bases. It extrapolates. If the base lies, the extrapolation lies too.
The second pillar is protecting the skin tones as the arbiter. A set can accept an extreme temperature if it is an intention. A main face that becomes plastic or orange breaks the viewer's belief in a few seconds. In practice, you watch the relation between luminance and chrominance on the faces. You avoid the global corrections that "repair" one shot by destroying another in the same scene.
The third pillar is the sequence continuity. A gorgeous isolated shot can ruin a chain if its temperature or its contrast does not speak the same language as the previous shot. Cinema is read in the transition. Your brain detects micro gaps even when you cannot name them. AI grading helps to bring shots closer, but you must validate in continuous playback, not in a frozen capture.
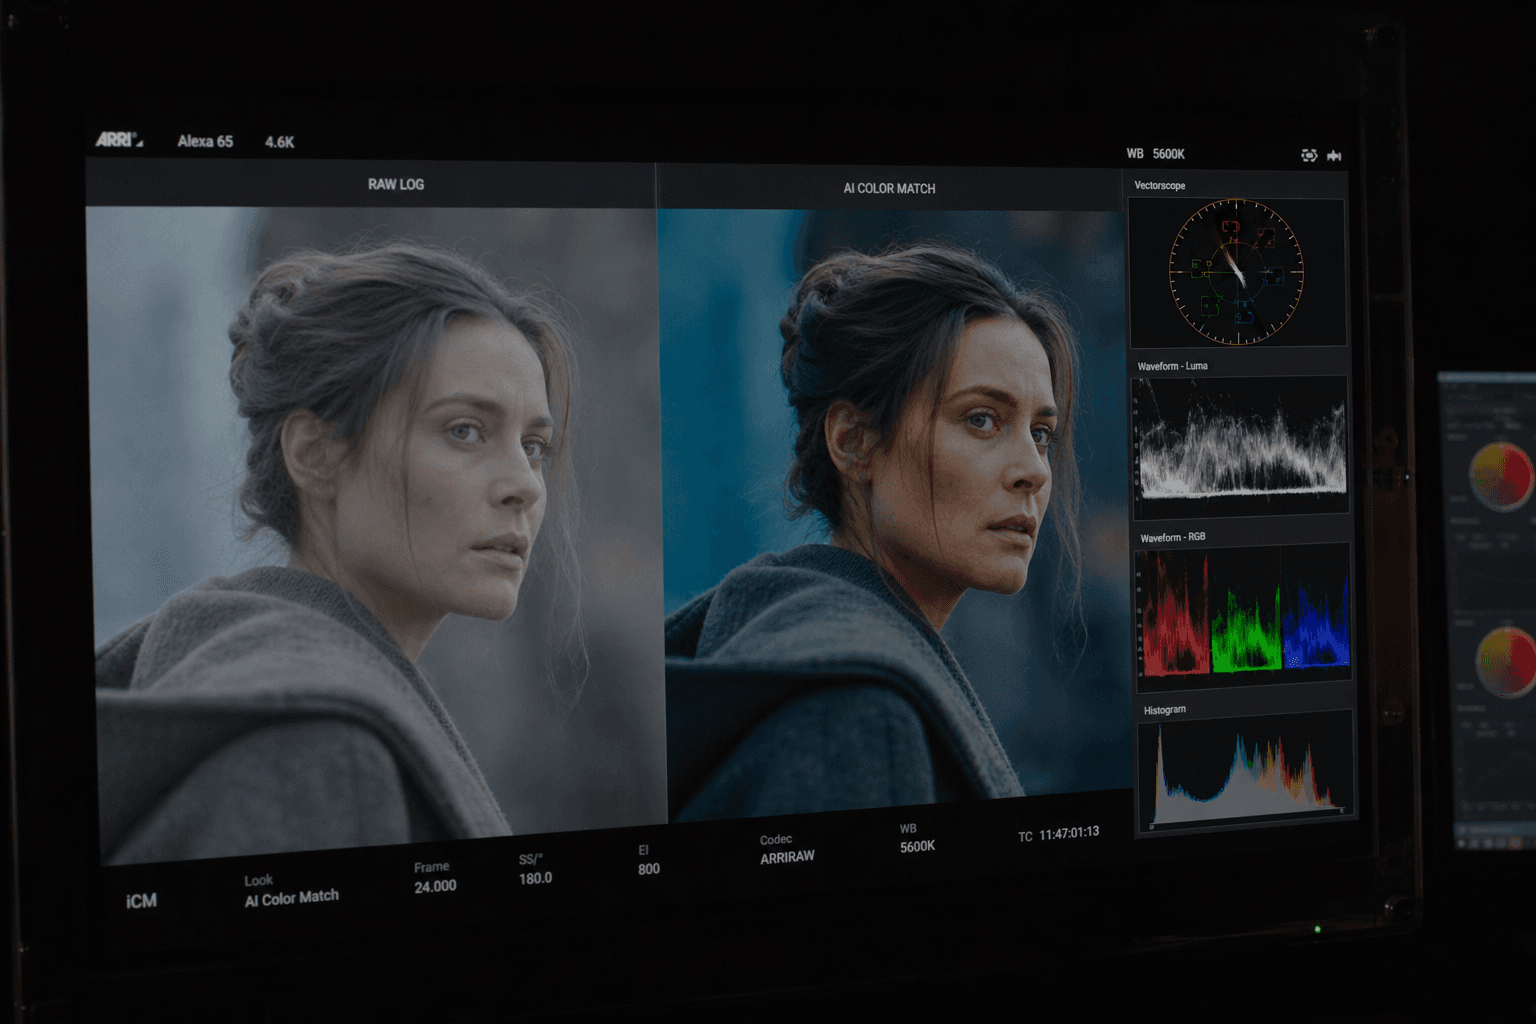
The fourth pillar is the control by scopes. Parade, vectorscope, waveform: it is not technical snobbery. It is an antidote to visual fatigue. After twenty minutes on a timeline, your eye adapts and lies to you. The scopes stay factual. They help you avoid the saturation excesses on the reds, the skin drifts, and the crushed blacks that seemed "cinema" on one screen but become mud on another.
The fifth pillar, often forgotten, is the textural consistency. Two shots can match in color and stay inconsistent in sharpness, noise, or compression. If you push the color on a very noisy shot, the noise becomes a dominant texture. Hence the interest of cleaning or managing the grain uniformly before locking the look. For a grain and filmic approach on a still image or mixed source shots, link this subject to our guide on adding cinema grain to an AI image.
💡 Frank's Cut: before adding a look, set a simple rule: no creative decision that degrades the readability of the gaze on your dialogue shots. You can darken the world, not the eyes.
The trench workflow: a reliable AI grading pipeline
You start with a normalization phase. All the sources must speak the same base language: working space, reference levels, LOG management if you have any. With no this, the AI will make strange jumps between shots. If you mix Rec.709, camera LOG, and "raw" AI exports, you must first align toward an intermediate standard understandable to you.
Then you identify the pivot shots: those that carry the main emotion of a scene and that have a representative light. You balance these shots by hand. They become the target toward which you bring the rest. It is more stable than asking the tool to guess a global intention on a heterogeneous block.
You move on with a color matching by groups. Same place, same time, same source type: you treat in coherent batches. Avoid the magic button on the whole film. You want statistical proximity between comparable images. Between two groups, you do a manual bridge pass to avoid the breaks.
You finish with a light creative style and a global control pass: very moderate vignetting, final contrast curve, mastered sharpening if necessary. Then you export tests on several screens. Not for pleasure. To avoid the surprise on mobile, where half your audience often lives.
For the projects that mix real takes and generated shots, keep a continuity with our article on the continuity errors and visual inconsistencies on an AI film, because the color cannot repair a false axis or a contradictory light.
Scenario A: hybrid short film, interior night, sensitive skin
You have three sources: a LOG camera, an interior AI shot, and stock footage corrected differently. You normalize everything in a common working space. You balance a pivot camera shot on the main face. You launch the AI match on the other camera shots of the same block. For the AI shot, you do not apply the same curve blindly: you first bring the global luminance closer, then you correct the skin with a soft mask. The stock footage receives a separate pass before the bridge. At the end, you add a single low-intensity look on the final node.
Scenario B: very stylized music clip, but with skins present
You want cyan in the shadows and warm highlights. You still do the neutral primary correction upstream. You apply the look in a layer, not in a destruction of the mids. You isolate the skins to limit the contamination of the tint split. You check the vectorscope to avoid the red of the lips going neon. You add uniform grain last to bind the sources.
Scenario C: archive restoration + prior upscaling
You edited after an upscaling pass. The risk is the halos and the lying noise. You clean slightly before grading, then you avoid the aggressive sharpness. The AI color match helps to harmonize archives from different sources, but you must watch the skin transitions on the historical faces. For the complete chain, our video upscaling to 4K guide stays the logical complement.
Step 1: prepare the rushes like a suite colorist
Classify your shots by scene and by light. It is a boring discipline that saves you hours. Clean the noise reasonably before raising the contrast, otherwise you amplify the dirt. Choose a reference shot per sequence and write in one sentence why it is the reference: exposure, emotion, color dominance.
Also document your intentions: cold exterior, warm interior, then a progressive convergence. This small text avoids getting lost when an AI suggestion proposes a seductive but off-intention result. If your light is still fuzzy at the moment of the storyboard or the generation, come back to the source: our guide to describing light like a director of photography in a prompt helps you lock dominances and contrasts even before the color.
Step 2: primary correction, harmony, and skin validation
You set black, white, and gamma so as to keep material in the hair and the fabrics without crushing the cast shadows. You apply the AI match help only when a group is homogeneous. You validate shot by shot on the cut points, because the eye sees the jumps on the faces first.
You check the skins on the vectorscope with humility: it is not a military science, but a safety net. If two shots have credible skins but different sets, it is often acceptable. If two shots have aligned sets but skins that change tint family, the viewer feels the cheat.
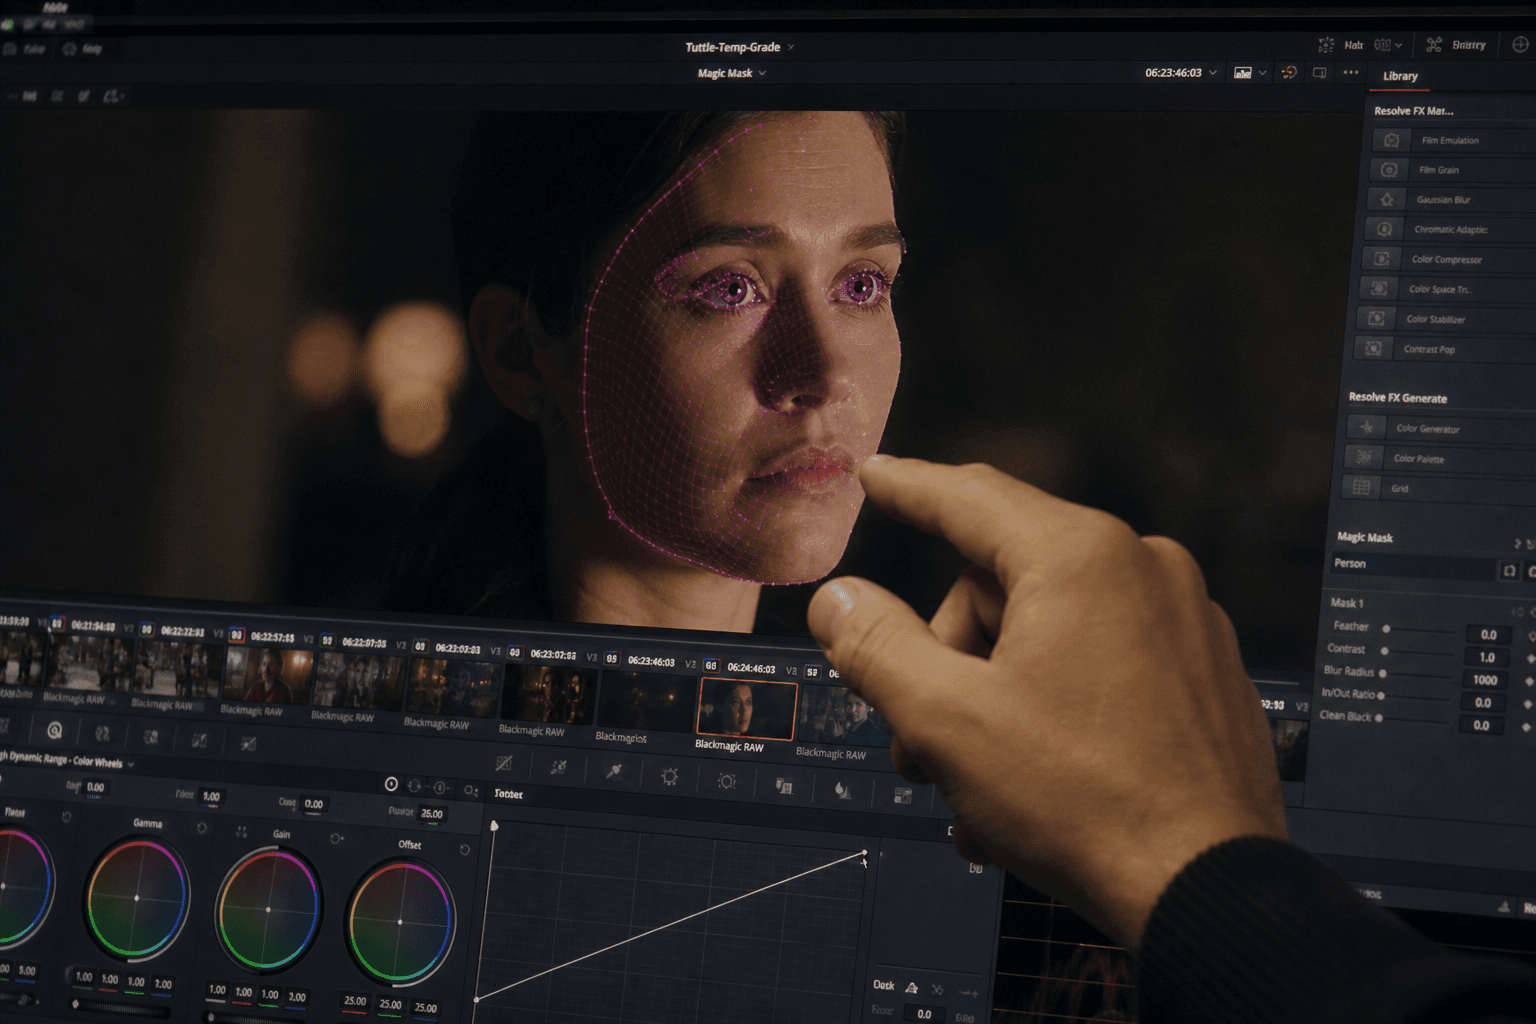
Step 3: smart masks, creative look, final grain
The AI subject-and-sky selection masks help you separate the domains with no heavy rotoscoping. Use them for local corrections, not to save a shot badly framed or badly lit at the base. The creative look must rise in intensity in steps. 70% look opacity often beats 100% on realistic scenes.
Finish with a coherent grain layer and a very moderate sharpening control. The public technical references on the making and the distribution of professional images insist on the metrology and the display consistency: EBU Tech publishes useful documents to understand how the broadcast standards influence what you judge on a screen.
Comparative table: grading approaches with or without AI
| Approach | Speed | Creative control | Main risk | When to choose it |
|---|---|---|---|---|
| AI auto alone | Very fast | Weak | Generic look, unstable skins | Draft, internal proof |
| Pure manual | Slow | Very high | Time, eye fatigue | Critical centerpiece |
| Hybrid AI + manual | Fast to moderate | High | Bad source groups | Independent production |
| Single LUT | Very fast | Weak | Skin / mixed-set disaster | Sources already perfect |
| Node layers + masks | Moderate | Very high | Complexity | Fiction, advertising |
Troubleshooting: what beginners break in AI grading
The first classic case is stylizing too early. You love your LUT, you put it before the balancing, and now each correction fights against it. Restart from the primary with no LUT, then reintroduce the look in a low dose.
The second case is ignoring the skins until the end. You end up with a gorgeous set and faces that look like wax. Isolate the skins, reduce the look intensity on that zone, or change LUT.
The third case is pushing saturation and contrast because the screen seems flat. Often the problem comes from the local luminance or the balance, not from the saturation. Read the scopes before compensating by eye.
The fourth case is the same preset on incompatible scenes. A jungle look cannot marry a hospital scene with no separation work. Segment by intention, not by ease.
The fifth case is delivering with no mobile and consumer-TV test. On a phone, the perceived gamma changes the shadow readability. On a TV, the sharpening can become garish. Do a fast control pass, even imperfect.
The sixth case is color matching the whole film in one block. You get a bland average. Come back to shot groups and manual pivots.
The seventh case is the digital sharpness excess after an AI generation. You compensate for a perceived blur by pushing the global sharpening, and you get edges that scream on the skins. First correct with a light reconstruction or a clean resize if necessary, then add localized sharpening on the zones that really benefit from it, rarely on the whole frame.
The eighth case is the white balance drift between two exports. You grade a version, then you reimport a new render with a slight shift. Lock a gray and skin reference on a witness shot, and compare before continuing a long session.
For the tool, DaVinci Resolve stays a solid base to seriously learn the language of nodes and scopes. The official documentation Blackmagic Design DaVinci Resolve helps to understand the foundations without losing you in the marketing modes.
💡 Frank's Cut: if you only have time for three settings, do balance, local face contrast, and look intensity. This trio solves a surprising part of the "I do not know why it looks cheap" problems.
FAQ
Foire aux questions
Réponses rapides aux questions les plus fréquentes sur cet article.
Can AI replace a colorist?
No in the sense of final art direction, yes in the sense of technical acceleration and harmonization. An experienced colorist transforms an intention into a system of grades, manages the multiple-source problems, and protects the faces in aggressive looks. AI helps you bring shots closer, propose starting points, and accelerate repetitive tasks on homogeneous groups. On a production where you are alone, the hybrid is the best compromise: you let the AI do the bulk of the bringing-together, then you manually correct the pivot shots and the sensitive cut points. The result holds better than a blind auto LUT, and stays under your creative control.
Which software to start seriously?
DaVinci Resolve is the most pedagogical choice for the scopes, the nodes, and the version management. The free version is largely enough to learn. What matters is not having a hundred plugins, but a stable pipeline: normalization, primary, local secondary, global look, grain, export. If you change tool every week, you do not develop the scopes reflex. Once the language is acquired, you can transfer the logic to other environments. For AI creators, Resolve also helps to integrate heterogeneous sources without losing your head.
Why do my skins become orange after a LUT?
Because a LUT is a global transformation. It does not know that your subject is a skin. It often pushes the reds and the mids in a way that pleased on another type of shot. The solution goes through a reduced intensity, a more neutral primary upstream, or an isolation of the skins to realign them. Sometimes, a LUT is simply incompatible with your real light. In that case, change LUT or build a look layer by layer. Think of the LUT as inspiration, not as a final button.
Should you grade before or after the VFX?
Do a reasonable primary correction before integration so that the VFX work on a stable image, then finalize the look after compositing. If you push an extreme look before effects, you complicate the keying, the light integrations, and the grain landmarks. After VFX, you unify with a global pass plus a local pass on the problem shots. This sequence reduces the surprises at the end of the chain.
How to know if my image is pushed too far?
Look on a non-calibrated screen and on a smartphone. If the shadows become a plate with no detail, or if the skins lose their natural variation, you are too far. Also use the scopes: a saturation that explodes on the vectorscope or blacks stuck to the floor are clear signals. When a viewer notices the color before the emotion, you are often beyond the useful threshold. Come back ten to twenty percent in intensity and retest.
How long for a short film?
With a clean hybrid workflow, one to two days can be enough for a short after a locked edit, plus a half-day of export controls. With no method, you can triple the time in emotional back-and-forths. The key factor is the quality of the source preparation. If you must repair ten AI shots inconsistent in light, the grading becomes a rescue. If your sources are clean, the AI really accelerates.
Are the scopes enough with no calibrated screen?
The scopes spare you gross mistakes, but a reasonably calibrated screen stays important for the feel of the mids and the fine textures. If you have no probe, at least use consistent screen profiles and multi-device tests. The goal is not laboratory perfection on an indie budget, but to avoid the extreme gaps. Combine scopes, reference captures, and continuous playback.
Should I work in LOG or Rec.709 for AI?
Work in a space consistent with your sources and your tool. If you do not yet master LOG, normalize toward an intermediate standard you understand, then grade. The frequent mistake is mixing different interpretations with no clear document. Document your input transform choices and stay stable over the whole project.